Assigning suppliers to items enables you to assign attributes, perform actions, and make rules that only apply to that item/supplier combination. For example, if you choose not to assign suppliers to items, you can assign attributes at:
the master item level - all attributes defined at this level apply to the item across all organizations and all suppliers.
the item organization level - all attributes defined at this level apply to the item only in this particular organization.
If you choose to assign suppliers to items, you can also assign supplier sites to items. For example, a supplier manufactures an item in two locations, San Francisco and Denver (the supplier sites). The characteristics of the item differ slightly depending on which supplier site ships to your retail store (organization). In this example, you can assign attributes at the following levels, in addition to the item and item organization levels described above:
item supplier - all attributes defined at this level apply to this item and supplier combination.
item supplier site - all attributes defined at this level apply to this item and supplier site combination.
item supplier site organization - all attributes defined at this level apply to this item, supplier site, and your organization combination.
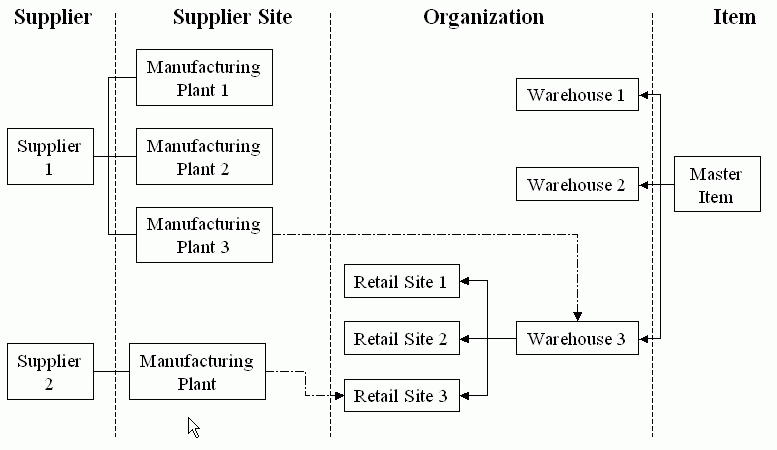
The following graphic depicts an item supplied to a company's retail stores, either directly to the store or through a warehouse. The suppliers can ship the item from more than one manufacturing plant (supplier site). In this scenario, a store either receives the item from it's warehouse or directly from a supplier. Supplier 1 ships to the warehouse, which then ships the item to the store, while supplier 2 ships the item directly to the store. The item attributes differ slightly, depending on which supplier, and even which supplier site, ships the item.
Note: Some users question how item supplier associations relate to the Approved Supplier List (ASL). The item supplier associations serve a different purpose than the Approved Supplier List. The item supplier associations can tell you which supplier and/or supplier location supply an item, but not whether the supplier is approved.
In the Item Overview page, select the Associations subtab. Select Supplier and Supplier Site Assignment from the left side of the page.
From the Supplier and Supplier Site Assignments page, click Assign.
In the Assign Items to Suppliers: Select Suppliers page, enter at least one of the following to identify the supplier, then click Next.
Supplier Name
Supplier Number
DUNS Number
Tax Payer ID
Tax Registration Number
Suggestion: Check the Show Supplier Sites box to narrow your search for specific suppliers and supplier sites. Checking this box enables you to enter supplier site information.
In the Assign Items to Suppliers: Review Supplier Results page, select the supplier and/or the supplier sites listed. Click Next.
This page lists the supplier and all supplier sites for the supplier.
In the Assign Items : Review Results page, review supplier and supplier sites selected. Click Finish.
If the supplier and supplier sites selected are incorrect, click Back to correct the error.
The process of assigning a supplier site and organization to an item is similar to the process described above of assigning a supplier and supplier site to an item, but with one more step - assigning an organization to the item supplier site.
In the Item Overview page, select the Associations subtab. Select Supplier Site Organization Assignment from the left side of the page.
Assign a supplier site as described above in "To assign a supplier and supplier site to an item:".
In the Assign Items to SupplierSites-Org: Select Organizations page, enter an organization code, name or hierarchy. Click Next.
Review the organization selected and click Next again.
Click Back if you want to change the organization.
In the Assign Items: Review Results page, you can review the supplier, supplier site, and organization assigned to the item. Click Finish.
Click Back if you want to change the supplier, supplier site, or organization.
You can view or update a single item supplier association from both the Supplier and Supplier Site Assignments page and the Supplier Site Organization Assignment page. To update all item supplier associations at once, you must import the changes using a spreadsheet.
To view and update attributes for a single item/supplier/supplier site/organization association
Navigate to either the Supplier and Supplier Site Assignments page or the Supplier Site Organization Assignment page.
In the Advanced Search region, search for and select an item/supplier/supplier site/organization intersection.
In the Supplier Assignment detail region, select the Attributes tab, then click Update.
Enter any changes to the item/supplier/supplier site/organization intersection attributes, then click Apply.
To view and update attributes for all suppliers, supplier sites, or supplier site organizations at once
Navigate to either the Supplier and Supplier Site Assignments page or the Supplier Site Organization Assignment page.
Click the appropriate button:
Update Supplier Attributes
Update Supplier Site Attributes
Update All Attributes (on the Supplier Site Organization Assignment page)
Select a display format to download, then click Export.
Note: The display format you select must contain attributes controlled at the appropriate level. For example, if you want to update supplier site attributes, the display format must contain attributes controlled at the supplier site level.
See Updating Existing Items Using a Spreadsheet for a detailed description of how to export, make changes, and import those changes.
For item supplier and item supplier site attributes, navigate to the Supplier and Supplier Site Assignments page. For item supplier site organization attributes, navigate to the Supplier Site Organization Assignment page. Select the supplier, supplier site, and/or organization intersection for which to view or update attributes.
Click one of the following:
Update Supplier Attributes
Update Supplier Site Attributes
Update All Attributes - use for updating the item supplier site organization intersection attributes.
Suggestion: You can update the item supplier and item supplier site attributes from the Supplier Site Organization Assignment page. For the selected item supplier site organization, click the Supplier and Supplier Site Assignment tab. All item supplier and item supplier site intersections are listed. Click the Additional Attributes icon for a particular row, then click Update.
Select a display format that contains attributes controlled at the intersection level selected. Click Export.
Select the application on your desktop to use for viewing the exported document. Click Next.
Choose whether to open or save the exported spreadsheet document.
Update the attributes, then save the spreadsheet to import later.
Navigate to the Supplier and Supplier Site Assignments page, then select the Formal Packs tab.
To update the pack type, select the Pack Type to use with the selected supplier or supplier site, then click Create Change Order.
See: Managing the Packaging Hierarchy and Creating a SKU Packaging Hierarchy.
You can create a change order for:
adding or removing a supplier or specific supplier site to or from an item
updating item supplier, item supplier site, or item supplier site organization attributes
For item supplier and item supplier site assignments and attributes, navigate to the Supplier and Supplier Site Assignments page. For item supplier site organization assignments and attributes, navigate to the Supplier Site Organization Assignment page. Select the supplier, supplier site, and/or organization intersection for which to view or update attributes.
Click Create Change Order. See: Creating Change Orders
Once you assign an item to a supplier, supplier site, or supplier site organization, you cannot delete this relationship. You can inactivate the relationship, though. In the (item/supplier/supplier site/organization) Assignment: Update Attributes page, change the Status attribute to Inactive.
