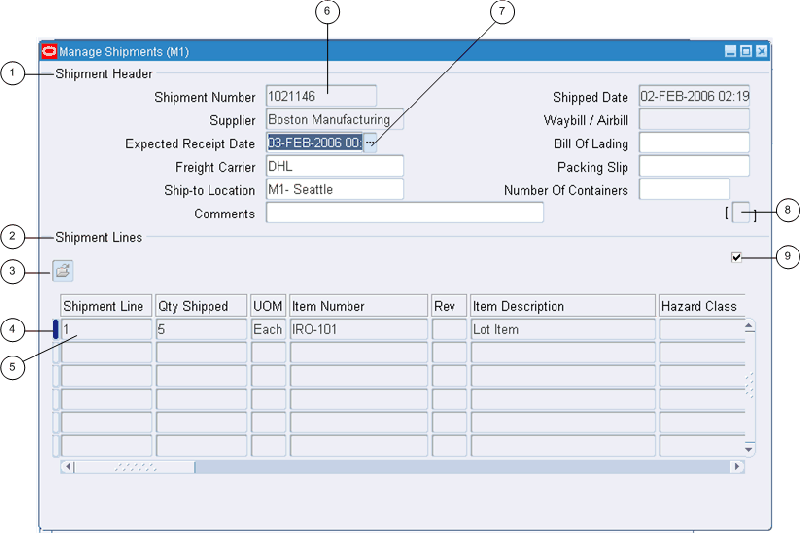
Use the following form components to enter and query data:
Single-Row Block
Multi-Row Block
Folder Indicator
Current Record Indicator
Record
Field
List of Values Indicator
Descriptive Flexfield
Master-Detail Coordination Box.
Use fields to enter, view, update, or delete information.
By default, a required field is displayed in yellow, and a read-only field is displayed in gray. These colors can be changed or turned off using profile options. See Defining Preferences with User Profile Options.
In some cases, the display size of a field is too small to show the entire field contents. Use the Edit Field toolbar icon to view and update these fields.
A record is a logical grouping of fields. A record is also referred to as a row or a transaction, since one record corresponds either to a row in a database table or to a transaction.
You must complete all required fields in a record before moving to the next record.
Tip: If you unintentionally enter a record and cannot advance your cursor, clear the record. From the Edit menu, choose Clear, then Record.
A block displays a set of records either in a single-row format or a multi-row format.
Tip: To clear data at the block level: From the Edit menu, choose Clear, then Block.
To create a record
Choose New from the File menu, or use the New toolbar icon.
After entering data for your new record, choose Save or Save and Proceed from the File menu to save the record to the database. Choosing Save and Proceed automatically advances you to the next record.
To delete a record
Choose Delete from the Edit menu.
This action erases the current record from your screen, and returns your cursor to the first field of the next record.
To delete the record from the database, choose Save or Save and Proceed from the File menu.
A field that has a predefined list of valid values displays an LOV icon. Select this icon to view the valid field values.
If a list contains more than 100 values, you are prompted to enter a Find string to limit the list.
To choose a value from a list
Select a value, or reduce the list using one of the following methods:
Without placing your cursor in the Find field, type the initial character(s) of a value to autoreduce the list to those items matching the characters entered. Use the Backspace key to re-expand the list. If your entry reduces the list to a single value, the list window closes and inserts the value into the field.
Note: Lists that require a Find string do not use the autoreduce feature.
In the list window, enter any group of characters in the Find field and select the Find button.
Note: Use the wildcard character (%) to represent any number of characters, and the underline (_) to represent a single character. Do not enter a wildcard character by itself. This will match all records.
Power List enables you to enter a search string or partial value in an LOV field without opening the list window.
To use Power List
Enter the initial characters of a value in the field and press the Tab key. Power List completes the entry for you.
Your entry can include wildcard characters.
If more than one value matches the characters you specify, a list window opens containing those values.
A Master-Detail relation is an association between two records. An example is the relationship between the Batch and Journals records in Oracle General Ledger. Each batch (master record) is associated with a set of journal entries (detail records).
Some master-detail blocks contain a coordination check box that allows you to choose whether detail records are queried. Select the master-detail coordination check box to automatically coordinate the update of records between the master and detail blocks. If you deselect the check box, the detail data is not displayed until you move your cursor into the detail block.
Some records provide additional details in separate, drill-down windows.
A wide-width current record indicator designates that a record provides drill-down information. Double-click the indicator to open the detail window.
A flexfield is a flexible data field that can be customized by your enterprise. Oracle E-Business Suite uses two types of flexfields:
Key flexfield - a field you customize to enter multi-segment values, such as part numbers or account numbers.
Descriptive flexfield - a field you customize to enter additional information not provided by Oracle E-Business Suite.
A key flexfield is composed of segments, where each segment has both a value and a meaning. For example, an Accounting Flexfield can be composed of segments that represent Company, Department, and Account. The segments are delimited by a segment separator (usually a "." or a "-").
A range flexfield is a type of key flexfield in which you can input a low and a high value for each segment to express a range of combinations.
A key flexfield looks like any other field. You can enter the segments directly or use the Flexfield window to enter each segment separately.
To enter data directly into a key flexfield
Enter the segment values, separating each with the segment separator.
To enter data using the flexfield window
Select the List of Values icon to open the flexfield window, or select the Edit Field... toolbar icon.
Enter a value for each segment, or use the list of values where available.
Select the Combinations button in the flexfield window to search the list of existing segment combinations.
To enter data in a range flexfield
Enter a Low and a High value for each segment, or use the list of values where available.
Note: The Flexfields: Open Key Window On Default profile option controls whether a flexfield window opens when you press Tab to leave a concatenated key flexfield.
If this profile option is set to Yes, the window opens if at least one of the segments has a default value defined. When you tab from the concatenated flexfield, the code automatically defaults defined values and opens the window to allow you to make changes.
If the profile option is set to No, then the flexfield window will not open for modifications, and assumes you want the defaulted values as part of the combination.
A descriptive flexfield appears as a two-character, unnamed field enclosed in brackets.
Move your cursor into the bracketed field to open the descriptive flexfield window. The window contains segments that make up the descriptive flexfield. Each segment can have a list of values.
To enter data in a descriptive flexfield
Open the descriptive flexfield window. If your profile option Flexfields:Open Descr Window is set to "No", or if you are in a folder, select the Edit Field... toolbar icon to open the flexfield window.
Note: For more information on profile options, see Defining Preferences with Personal Profile Options.
Enter a value for each segment, or use the list of values where available. Default values can be overwritten.
Windows that allow the entry of records in multiple languages display the enabled Translations... toolbar icon.
To enter a translation for a record
Select the record you wish to translate.
Select the Translations... icon from the toolbar.
The Translations window opens, with translatable fields displayed in columns. The installed languages are displayed in rows.
Enter translations for the displayed fields.
Use keystroke combinations to perform many menu functions.
To view the list of functions and keystroke combinations
Choose Keyboard Help... from the Help menu.