The Oracle E-Business Suite Release 12.2 user migration utilities include:
The AppsUserExport tool, which exports existing application accounts from Oracle E-Business Suite Release 12.2 into an intermediate LDIF file. This tool is a Java program that is invoked from the command line on an Oracle E-Business Suite application tier machine.
The LDAPUserImport tool, which reads an LDIF file, creates new Oracle E-Business Suite application accounts as needed, and imports the data. This tool is invoked from the command line. LDAPUserImport is provided for bulk migration of existing Oracle Directory Services accounts into Oracle E-Business Suite Release 12.2.
See below for details of the migration process between Oracle E-Business Suite Release 12.2 and Oracle Directory Services, and the usage of these tools.
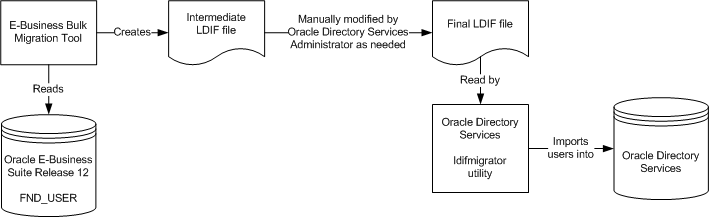
An Oracle E-Business Suite administrator can use AppsUserExport to export a selected set of application accounts from the Oracle E-Business Suite native user directory (FND_USER) into an intermediate LDIF file. An Oracle Directory Services administrator then uses the Oracle Directory Services ldifmigrator utility to convert this intermediate LDIF file into a final LDIF file, based on Oracle Directory Services deployment choices. The Oracle Directory Services administrator then loads the final LDIF file into Oracle Directory Services using the bulkload utility.
The migration process and intermediate LDIF format are explained further in Oracle Fusion Middleware Administrator's Guide for Oracle Internet Directory and Oracle Fusion Middleware Administering Oracle Unified Directory. In addition, usage of the ldifmigrator tool is described in Oracle Fusion Middleware Reference for Oracle Identity Management.
Note: If you plan to implement a password hashing scheme for Oracle E-Business Suite user passwords, you should perform the export of application accounts and bulk load to Oracle Directory Services before you implement the password hashing scheme. After you implement password hashing, the AppsUserExport utility can no longer include the passwords when exporting Oracle E-Business Suite user information. See: "Using ADPASSWD to Migrate to a Password Hashing Scheme" in the Oracle E-Business Suite Maintenance Guide.
If you have already implemented password hashing but you want to export Oracle E-Business Suite users to Oracle Directory Services, then the following options are available.
Option 1
Ensure that passwords can be synchronized from Oracle E-Business Suite to Oracle Directory Services by setting the Oracle Directory Services provisioning profile for deployment from Oracle E-Business Suite to Oracle Directory Services and enabling the Applications SSO LDAP Synchronization (APPS_SSO_LDAP_SYNC) profile option.
Run AppsUserExport with the -g option to create and copy your users' GUID values and import them into Oracle Directory Services.
Expire these users' passwords using the AFCPEXPIRE.sql script.
Direct users to log in to Oracle E-Business Suite using the local login and change their passwords. Once a user's password is reset, the user should be able to log in through single sign-on.
Option 2
Export users using AppsUserExport without the -g option and import the users into Oracle Directory Services.
The Identity Management administrator should determine the best approach to set the users' passwords and communicate this approach to the users.
The next section focuses on application-specific tasks.
Task 1: Exporting Application Accounts into Intermediate LDIF File
Determine which accounts to migrate
Having determined which accounts to export, the application administrator can then specify whether an account is migrated by utilizing the following profiles:
Applications SSO Login Types (APPS_SSO_LOCAL_LOGIN) - An account will not be migrated if the user level profile value of the account is 'LOCAL', i.e. the account is a local account.
Applications SSO LDAP Synchronization (APPS_SSO_LDAP_SYNC) - An account will not be migrated if the user level profile value of the account is 'N', i.e. the account is marked to not synchronize with Oracle Directory Services.
Oracle E-Business Suite ships a number of standard accounts, such as SYSADMIN and GUEST. These accounts should not be migrated. To enforce this, the SYSADMIN and GUEST accounts are pre-seeded with Applications SSO Login Types (APPS_SSO_LOCAL_LOGIN) set to 'LOCAL' and Applications SSO LDAP Synchronization (APPS_SSO_LDAP_SYNC) set to 'N'.
Important: Accounts with user_id less than 10 can only be logged into locally, and not through single sign-on (you can check for these with the query select user_name from FND_USER where user_id < 10).
Use AppsUserExport to extract user information
Use the AppsUserExport tool to extract application user information into an intermediate LDIF file. This tool is invoked from the command line.
Note: The list of attributes migrated to Oracle Directory Services from Oracle E-Business Suite is currently limited to those listed in Supported Attributes.
To invoke the AppsUserExport tool, ensure your environment is set up correctly, and use the following syntax. Note that all parameters can if desired be entered on the same command line; they are shown here on different lines (using the UNIX '\' continuation character) for clarity.
java oracle.apps.fnd.oid.AppsUserExport \ [-v]
 - dbc <dbcfile> \
-o <outputfile> \
-pwd <apps schema pwd> \
-g
[-l <logfile>]
where:
[-v] - Run in verbose mode
<dbcfile> - Full path to the dbcfile
<outputfile> - Intermediate LDIF file
<apps schema pwd> - Apps schema password
-g - Create and copy users GUIDs to OID
<logfile> - Log file (default is <outputfile>.log)
For example:
java oracle.apps.fnd.oid.AppsUserExport \
-v \
-dbc $FND_SECURE/myebiz.dbc \
-o users.txt \
-pwd password \
-g \
-l users.log
Warning: The resulting data file and log file may contain confidential information, such as the start and end dates for a user's account, and should therefore be secured appropriately.
Task 2: Converting Intermediate LDIF File to Final LDIF File
Before performing loading data into Oracle Directory Services, the Oracle Directory Services administrator needs to ensure that:
The extracted data file is copied from the Oracle E-Business Suite instance to Oracle Directory Services.
If the provisioning profile has been set up for the Oracle E-Business Suite instance and the profile mode is either OUTBOUND or BOTH (i.e. you have enabled any provisioning events from Oracle Directory Services to Oracle E-Business Suite), the profile will need to be temporarily disabled during the migration process.
To convert the intermediate LDIF file to the final LDIF format:
The intermediate LDIF file created by AppsUserExport has two variables that an Oracle Directory Services administrator needs to instantiate using the Oracle Directory Services ldifmigrator utility:
s_UserContainerDN - DN of the entry under which all users are added, for example cn=users,dc=us,dc=oracle,dc=com.
s_UserNicknameAttribute - The nickname attribute used for user entries in the subscriber, such as uid.
For example:
ldifmigrator "input_file=data.txt" \
"output_file=data.ldif" \
"s_UserContainerDN=cn=users,dc=us,dc=oracle,dc=com" \
"s_UserNicknameAttribute=uid"
Important: Note that the variable names above are case sensitive.
If you encounter problems running any of the Oracle Directory Services command line tools such as oidprovtool or ldapsearch, refer to the Oracle Fusion Middleware Administrator's Guide for Oracle Internet Directory or Oracle Fusion Middleware Administering Oracle Unified Directory for more information.
Task 3: Loading Final LDIF file into Oracle Directory Services
Once the final LDIF file has been generated, the user data is ready to be uploaded into Oracle Directory Services. Import can be done in either online or offline mode. This section describes the basic commands required in offline mode.
Additional Information: For further details, see Oracle Fusion Middleware Administering Oracle Unified Directory or Oracle Fusion Middleware Administrator's Guide for Oracle Internet Directory.
Before performing a bulk load, use the manageProvProfiles tool with operation=DISABLE to disable the profile before the migration is started (the oidProvTool tool CLI is still supported for backwards compatibility).
For example:
manageProvProfiles operation=disable \
ldap_host=testsys1.example.com \
ldap_port=3060 \
ldap_user_dn=cn=orcladmin \
application_dn="orclApplicationCommonName=beta,cn=EBusiness,cn=Products,cn=OracleContext,dc=example,dc=com" \
profile_mode=BOTH
Important: Do not add spaces after any of the commas in the application_dn parameter.
Loading the LDIF File into Oracle Internet Directory:
Before using the bulkload utility to load the LDIF file, stop all Oracle Internet Directory processes by running the following command from the OID Oracle home:
$ORACLE_HOME/opmn/bin/opmnctl stopall
Note the OID password, which should be the same as the instance and orcladmin passwords. You will be prompted for this when running the utility.
You must ensure that no Oracle Internet Directory processes are running before continuing with the bulkload command. If any other OID processes such as odisrv are still running, stop them manually using the command:
oidctl connect=<SID> server=<servername> instance=<#> stop
Loading the LDIF File into Oracle Unified Directory:
In offline mode, the directory server must be stopped:
$ORACLE_INSTANCE/OUD/bin/stop-ds
Import the LDIF file:
import-ldif -b ou=people,dc=example,dc=com -l <full path to LDIF file> -n userRoot --append -R <path to rejected entries log file>
The user namespaces contained in an LDIF file that is to be bulk loaded must be unique and non-overlapping. When bulk loading users into Oracle Directory Services, the potential for collisions (duplicate users) exists. Collisions can result when integrating multiple sources into a single Oracle Directory Service instance or by performing an import more than once for the same LDIF file. As collisions can lead to numerous problems, you should follow the steps below to ensure that they do not occur:
To Prevent Collisions in Oracle Internet Directory:
Run the bulkload utility with the check and generate options to verify that there are no duplicate users. For example:
bulkload connect=<connect string> check=true generate=true file=<full path to LDIF file>
Check the log file for duplicate users.
If the log file indicates duplicate users, manually remove these users from the LDIF file.
Rerun Step 1 to verify all duplicates have been successfully removed.
Once all duplicates are removed, run the bulkload utility with the - load option to load the users.
For example:
bulkload connect=<connect string> load=true file=<full path to LDIF file>
Additional Information: For further details of the bulkload utility, see the Oracle Fusion Middleware Administrator's Guide for Oracle Internet Directory.
Instead of the bulkload utility, the ldapadd command can also be used for Oracle Internet Directory:
ldapadd -h <host> -p <port> -D "cn=orcladmin" -w <password> -f <full path to ldif file>
Warning: As some operating systems also include an ldapadd executable (which will not work with Oracle Directory Services), it is advisable to specify the full path of $ORACLE_HOME/bin/ldapadd to ensure the correct one is used.
To Prevent Collisions in Oracle Unified Directory:
For Oracle Unified Directory, import-ldif should be used to avoid duplicate users. For example:
import-ldif -h localhost -port 4444 -D "cn=Directory Manager" -w password -X -l /ldif-files/example.ldif --rejectFile rejected.ldif --skipFile skipped.ldif
You can also use the ldapmodify command instead of import-ldif:
ldapmodify -h <host> -p <port> -D "cn=Directory Manager" -w password -a -f <full path to ldif file>
For further details on the import-ldif and ldapmodify utilities, see Appendix A of Oracle Fusion Middleware Administering Oracle Unified Directory.
Importing Multiple LDIF Files
It is possible to bulk load to import multiple LDIF files. The most common scenario is one in which multiple LDIF files are generated from different Oracle E-Business Suite instances. Consolidating user information from each Oracle E-Business Suite instance into a single Oracle Directory Services can reduce the administrative overhead of managing multiple user repositories.
The user namespaces from each Oracle E-Business Suite instance's LDIF file must be unique and non-overlapping. For example, if username "John.Brown" exists in the LDIF file to be imported from Oracle E-Business Suite instance A, it must not exist in the LDIF file to be imported from Oracle E-Business Suite instance B. If these usernames do not correspond to the same user, then the username should be updated in Oracle E-Business Suite instance B. This will both distinguish between the two users and eliminate the duplication. Otherwise, the username must be removed from the LDIF file from instance B.
Once the LDIF file for Oracle E-Business Suite instance A has been bulk loaded into Oracle Directory Services, then the procedure should be done for the LDIF file for Oracle E-Business Suite instance B. By removing the duplicate users from the LDIF file, only the unique users from Oracle E-Business Suite instance B should bulk loaded into Oracle Directory Services. If a third Oracle E-Business Suite instance is to be bulk loaded, the same procedure should be carried out: after removing the duplicate users from the LDIF file, only the users unique to Oracle E-Business Suite instance C will be bulk loaded into Oracle Directory Services.
Sample Intermediate LDIF File
The following sample is an excerpt from an intermediate LDIF file:
# user name = 001
dn:: Y249MDAxLCAlc19Vc2VyQ29udGFpbmVyRE4l
sn:: MDAx
%s_UserNicknameAttribute%:: MDAx
description:: VGVzdGluZyBPSUQgc3luYw==
mail:: MDAxQG9yYWNsZS5jb20=
facsimileTelephoneNumber:: NjUwLTU1NS0xMTEx
orclActiveStartDate: 2003040316242131
orclIsEnabled: ENABLED
userPassword: {MD5}IB8AtcpdZaHBGOXjJDFRTA==
orclGuid: B9A5009B1603A500E030028A9F9E7C98
objectClass: inetOrgPerson
objectClass: orclUserV2
Password Restrictions and Bulk Loading
Passwords stored in Oracle Directory Services are case-sensitive. Mixed-case passwords in Oracle E-Business Suite are migrated with the case preserved.
The passwords in the LDIF file are encrypted using the MD5 hashing method If errors occur while importing the LDIF file into Oracle Directory Services, check the hashing method used by Oracle Directory Services. If is not MD5, using ODM reset the import hashing method to MD5 and try importing the LDIF file.
When you export users from Oracle E-Business Suite and create an LDIF file, the passwords are encrypted and so the bulk loader cannot verify if they follow Oracle Directory Services password policy. Therefore, the password policy cannot be enforced when such users are bulk-loaded into Oracle Directory Services.
Task 4: Update lastchangenumber and Restart Oracle Directory Services Processes
Start all Oracle Directory Services processes.
$ORACLE_HOME/opmn/bin/opmnctl startall
Update the lastchangenumber attribute of the profile.
First, find the current last change number in Oracle Directory Services with the ldapsearch command:
$ORACLE_HOME/bin/ldapsearch -h <host> -p <port> -D <bindDN> \
-w <bindDN pwd> -s base -b "" "objectclass=*" \
lastchangenumber
Next, the oidprovtool command may be used to update the lastchangenumber attribute to the number n that was discovered in the last step. The oidprovtool command can be used with either Oracle Internet Directory or Oracle Unified Directory with the syntax provided below:
oidprovtool operation=MODIFY \
ldap_host=<ldap_host> \
ldap_port=<ldap_port> \
ldap_user_dn=<user to connect to LDAP> \
ldap_user_password=<user password> \
application_dn=<dn of the registered app for which the profile is modified> \
orclLastAppliedChangeNumber=<n>
For example:
oidprovtool operation=MODIFY \
ldap_host=testsys1.example.com \
ldap_port=3060 \
ldap_user_dn=cn=orcladmin \
application_dn="orclApplicationCommonName=testsys1,cn=EBusiness,cn=Products,cn=OracleContext,dc=example,dc=com" \
orclLastAppliedChangeNumber=100
You can also use the manageProvProfiles command:
manageProvProfiles operation=MODIFY \
ldap_host=<ldap_host> \
ldap_port=<ldap_port> \
ldap_user_dn=<bindDN> \
application_dn=<dn of the registered app for which the profile is modified> \
lastchangenumber=<number>
For example:
manageProvProfiles operation=MODIFY \
ldap_host=testsys1.example.com \
ldap_port=3060 \
ldap_user_dn=cn=orcladmin \
application_dn="orclApplicationCommonName=testsys1,cn=EBusiness,cn=Products,cn=OracleContext,dc=example,dc=com" \
lastchangenumber=100
Additional Information: Reference the Oracle Fusion Middleware Administrator's Guide for Oracle Directory Integration Platform for more information.
Use oidprovtool with operation=ENABLE to enable the profile.
Task 5: Create Subscriptions for Bulkloaded Users
The bulkload tool does not automatically subscribe users to the parent Oracle E-Business Suite instance. To create the subscriptions for your bulkloaded users, run the following SQL statement on your Oracle E-Business Suite database:
select user_name from FND_USER where
FND_profile.VALUE_SPECIFIC('APPS_SSO_LOCAL_LOGIN', user_id)<>'LOCAL' and
FND_profile.VALUE_SPECIFIC('APPS_SSO_LDAP_SYNC', user_id)='Y'
You can save the results of this query in a text file using your SQL client's capabilities. See Manual Subscription Management With Provsubtool for details on how to run provsubtool to add these users to the subscription list.
The LDAPUserImport command-line utility takes an LDIF file generated from Oracle Directory Services, and inserts appropriate data into the Oracle E-Business Suite schema. It can be used for bulk migration of existing accounts from Oracle Directory Services to Oracle E-Business Suite. LDAPUserImport updates both FND and TCA schema.
Warning: Importing user accounts and related information into Oracle E-Business Suite is a resource-intensive operation that may take a significant amount of time, as large amounts of business events and DML statements are issued in the process.
Task 1: Export Oracle Directory Service users into LDIF file
For Oracle Unified Directory
Oracle Unified Directory utilizes the export-ldif command-line utility. Similar to import-ldif, this command can be run in either offline or online mode. The following shows an example in offline mode:
$ORACLE_INSTANCE/OUD/bin/export-ldif
-b dc=example,dc=com -n userRoot -l /usr/temp/export.ldif
For more information, see: Oracle Fusion Middleware Administering Oracle Unified Directory.
For Oracle Internet Directory
The Oracle Internet Directory ldifwrite command-line utility is used to create an LDIF file that can be loaded into the Oracle E-Business Suite schema by using the LDAPUserImport command-line utility.
Syntax and usage details for ldifwrite are described in the Oracle Fusion Middleware Administrator's Guide for Oracle Internet Directory.
General syntax of the command is:
ldifwrite - c <db connect string> -b <base dn> -f <LDIF file>
For example:
ldifwrite -c asdb -b "cn=Users,dc=us,dc=example,dc=com" -f output.ldif
Note: Do not modify the output file output.ldif in any way before proceeding with Task 2 below.
Task 2: Import LDAP Users into Oracle E-Business Suite using LDAP UserImport
The LDAPUserImport tool is run from the command line using the following steps:
Note: The list of attributes migrated to the Oracle E-Business Suite from Oracle Directory Services is limited to those described later in Supported Attributes.
Ensure the environment is set up properly.
Invoke the LDAPUserImport tool with the following syntax: Note that all parameters can be entered on the same command line; for clarity, they are shown on different lines here (using the UNIX '\' continuation character).
java oracle.apps.fnd.oid.LDAPUserImport \
[-v] \
 - dbc <dbcfile> \
-f <ldiffile> \
-n <nicknameattribute> \
-b <size in integer> \
-d \
[-l <logfile>] \
[-tcaRecord <N or Y>] \
[-defresp <N or Y>]
where:
[-v] - Run in verbose mode.
<dbcfile> - Full path to the dbc file.
<ldiffile> - LDIF file.
<nicknameattribute> - Name of the attribute used as the nicknameattribute in OID.
<logfile> - Log file name. If not specified, the default is LDAPUserImport.log.
-defresp - Indicates whether to assign the default responsibility 'Preferences SSWA' to the uploaded users or not. Default is 'Y' (assign the responsibility).
For example:
java oracle.apps.fnd.oid.LDAPUserImport \
-v \
-dbc $FND_SECURE/myebiz.dbc \
-f users.ldif \
-n uid \
-l users.log
If the LDAP record already exists in the Oracle E-Business Suite instance, the following actions are taken:
The duplicate record is ignored.
The log file is updated with a reference to the duplicate record.
Processing continues to the next LDAP record.