Once you have created and downloaded your document, you can begin working with your data. Use the Oracle tab on the Microsoft Excel ribbon to access additional Oracle Web Applications Desktop Integrator features that extend the functionality of the spreadsheet.
Note: Except where noted, the same steps apply for working with spreadsheets created in the OOXML format as for those not created with OOXML.
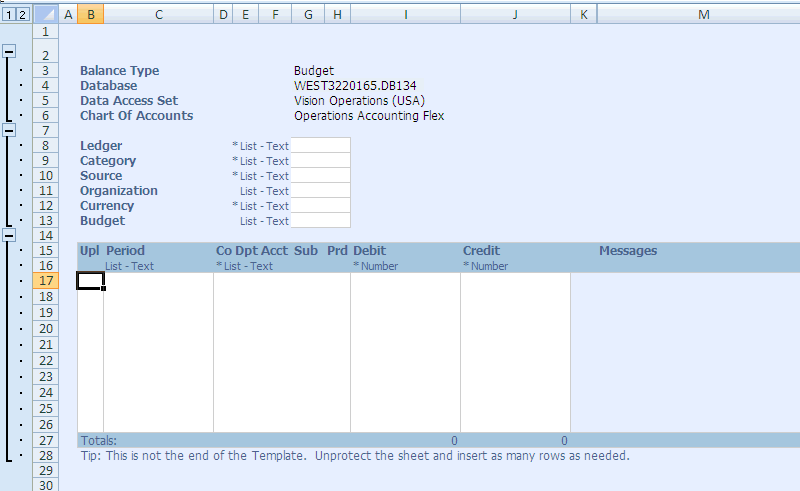
Example Spreadsheet
If you do not use digital signatures in Oracle Web Applications Desktop Integrator, then you must enable the Oracle Web Applications Desktop Integrator macros on a case by case basis within Microsoft Excel. In this case Microsoft Excel prompts you to enable the macros whenever you create or open an Oracle Web Applications Desktop Integrator spreadsheet. See: Selecting Macro Security Settings in Microsoft Excel.
If you set the BNE Enable Digital Signature profile option to have Oracle Web Applications Desktop Integrator affix a digital signature to the spreadsheets you create, then you can select a high macro security level in Microsoft Excel. The first time you create a signed Oracle Web Applications Desktop Integrator spreadsheet, you must identify the Oracle Web Applications Desktop Integrator macros as coming from a trusted source. Subsequently, whenever you create a signed spreadsheet, Microsoft Excel automatically allows the macros to run. See: Selecting Macro Security Settings in Microsoft Excel.
Note: If you create a digitally signed spreadsheet, it is recommended to work without saving in order to preserve the signature. If you save an Oracle Web Applications Desktop Integrator spreadsheet, then the Oracle signature is discarded, because the content of the spreadsheet is no longer controlled by Oracle. To continue working on the spreadsheet, you can use one of these options:
Change your macro security settings to a medium security level temporarily while performing tasks that use Oracle Web Applications Desktop Integrator macros, such as using lists of values or performing an upload to Oracle E-Business Suite.
Create a new digitally signed Oracle Web Applications Desktop Integrator spreadsheet, and copy and paste the modified data from the saved, unsigned spreadsheet to the new signed spreadsheet. You can then continue working in the new spreadsheet at the same security level.
Attach your own digital signature from a trusted source to the spreadsheet and save the spreadsheet again.
Use the expand and collapse buttons at the left of the spreadsheet to show or hide each of the sections: Context, Header, and Lines.
Note: When you initially create your spreadsheet, the sheet is protected by default. You must unprotect the sheet before you can use the expand and collapse buttons.
You can optionally turn on Microsoft Excel filtering on the line items. This is useful when your spreadsheet contains many rows of data. To enable filters, from the Oracle ribbon tab, select the Filters toggle button. To turn filters off, select the Filters toggle button again. To return to the default filter settings, from the Oracle ribbon tab, select Reset Filters.
The hint text for a field displays an asterisk (*) if the field is required and indicates the data type of the field (number or text). If the field shows the List hint, then you can double-click the field to access the list of values.
Your spreadsheet may contain multiple worksheets if your product integrator is defined to generate multiple worksheets. Also, if your site does not use the OOXML format and your downloaded data exceeds 64,000 rows, then multiple worksheets will be automatically created.
If your spreadsheet contains multiple worksheets, then when you are uploading data, you can choose either the Upload button or the Upload All button in the Oracle ribbon tab. Upload will upload only the current worksheet. Upload All will upload all worksheets.
If your integrator supports graphs, your spreadsheet will include additional graphing options.
If the layout for your integrator was designed with the Include Graph of Lines Data option or the Automatically Generate Graph option selected, then a graph of the data will be generated automatically when you download the spreadsheet. Otherwise, view the graph of your line data by selecting one of the following buttons from the Oracle ribbon tab.
Graph All - Creates a graph of the data on the active worksheet.
Graph Selection - Creates a graph of the selected data on the spreadsheet.
Graph Variation - This option is available for multi-sheet downloads, where each sheet contains data from a different source. The data in each sheet shares the same Category and Series. The graph will display the same series column from each worksheet.
Note: Excel limits the number of data points that can be used in a graph.
Note: Oracle Web Applications Desktop Integrator graphs the data according to the graph definition specified in the layout. For more information, see Defining Layouts. The graph can be changed on the graph worksheet by selecting Modify Graph Type or Modify Graph Options from the Oracle ribbon tab.
To add rows to an open spreadsheet:
Unprotect the spreadsheet: In the Review tab, select Unprotect Sheet. Note that some spreadsheets are defined with protection turned off.
Note: Certain regions of the spreadsheet will remain uneditable even when protection is turned off.
Select a row in the Lines section of the spreadsheet.
In the Home tab, select the Insert button, then Insert Sheet Rows. Repeat to add as many rows as you need. Oracle Web Applications Desktop Integrator displays a flag in the Upl column beside every row you add.
To enter data, either type the data directly in the spreadsheet field, or if the field shows the List hint, then you can double-click the field to access the list of values. Alternatively, you can select the field and then choose List of Values from the Oracle ribbon tab. The hint text for the field displays an asterisk (*) if the field is required, and indicates the data type of the field (number or text).
If desired, protect the spreadsheet by selecting Protect Sheet in the Review tab.
If you need to remove a row of data from the Lines section of the spreadsheet, select the entire row and delete it.
Note: To preserve the structure of your Oracle Web Applications Desktop Integrator spreadsheet, do not delete individual cells from the Lines section. Deleting an individual cell causes the spreadsheet's structure to become inconsistent as the remaining cells shift in position.
Additionally, do not delete any cells or rows from the Context and Header sections.
To enter data, either type the data directly in the spreadsheet field, or if the field shows the List hint, then you can double-click the field to access the list of values. Alternatively, you can select the field and then choose List of Values from the Oracle ribbon tab. The hint text for the field displays an asterisk (*) if the field is required, and indicates the data type of the field (number or text).
If the list of values depends on another field, you must a enter a value for the referenced field before you can select a value for the dependent field.
Note: For a field that contains a date value, the date format should match the date format defined for the integrator in the integrator LDT file.
If desired, protect the spreadsheet by selecting Protect Sheet in the Review tab.
To upload a password-protected spreadsheet without entering the password during the upload process, you must protect the spreadsheet according to the following steps.
In the Review ribbon tab, choose the Unprotect Sheet button.
Select the Messages column and the column prior to it.
Right-click in the spreadsheet, and from the resulting menu, select Format Cells.
Navigate to the Protection tab.
Deselect the Locked check box.
Make changes in the sheet to add the data you want to upload.
Navigate to the Review ribbon tab and choose the Protect Sheet button.
Enter the password you want to use.
Select the following check boxes:
Select locked cells
Select unlocked cells
Format cells
Format columns
Edit objects
Then choose the OK button.
In the confirmation dialog box, reenter the password and choose the OK button.
You can then upload the data as usual.
You cannot copy an entire worksheet to a different worksheet. However, you can copy row and column values from one worksheet to another Oracle Web Applications Desktop Integrator worksheet, and then upload the data. Copying the entire worksheet is not supported because, while rows and columns are copied, the macro code behind the Oracle Web Applications Desktop Integrator worksheet is not copied over to the new sheet.
If exporting is enabled for tables in Oracle Application Framework pages, then you can download the information from these tables as Oracle Web Applications Desktop Integrator spreadsheets for offline review and analysis. The exported spreadsheet includes all the records in the table, not only those displayed in the page.
Spreadsheets exported from Oracle Application Framework tables are read-only. You cannot upload data from this type of spreadsheet to Oracle E-Business Suite. You also cannot re-download to refresh the data within this type of spreadsheet. However, you can perform a new export from the original table to download a new spreadsheet with the latest data.
Note: Because the relevant functions are not available for spreadsheets exported from Oracle Application Framework tables, the Oracle ribbon menu does not appear in these spreadsheets. These spreadsheets also do not display data entry hints.
Spreadsheets exported from Oracle Application Framework tables are always created as OOXML documents, regardless of the format your site uses for other spreadsheets. Number and date values in these spreadsheets are formatted according to your Microsoft Excel settings.