Layouts enable you to customize the user interface presented in your spreadsheet. Use the layout functionality to determine the fields in a spreadsheet, set their positions, and specify default values for the fields.
A layout must be available before you create a spreadsheet in the Create Document interface. Some integrators offer predefined layouts, or you can use the procedure described in this chapter to create a layout.
Note: For some products, the layouts are predefined and preselected. Therefore you cannot select an alternate layout during document creation.
Note: Unless you log in as a user who is assigned the System Administrator responsibility, you must be granted access to an integrator to modify its layout. Specific form functions grant access to specific integrators. See the product-specific documentation for information regarding access to individual integrator layouts.
Use the Define Layout interface to perform the following:
Define a new layout
Modify an existing layout
Duplicate a layout from the list and save it under a different name. You can then modify this duplicated layout.
Delete a layout from the list
When you define a layout, you must first select the integrator to which the layout applies. Then choose to create a new layout or select an existing layout to update. You can then define the layout properties, including the following:
A name for the layout.
The fields that should appear in the context. The context appears at the beginning of the spreadsheet as read-only, contextual information. For example, use the context to display static information that does not vary from one instance to another.
The fields that should appear in a header. A header includes fields whose values are the same for every record in the spreadsheet. This region appears after the context and before the line region in the spreadsheet.
If your document has one header, all fields that you identify as header fields will be displayed in a single vertical list. If you define multiple headers, they are displayed in multiple lists placed horizontally across your document. If your layout includes numerous header fields, consider defining multiple headers to make it easier for users to see all the header fields.
The fields that should appear in the lines. The line region includes fields whose values can vary for different records in the spreadsheet. The rows of data in this region represent the records that will be uploaded to Oracle E-Business Suite. The line region appears after the header.
Oracle Web Applications Desktop Integrator provides two versions of the Define Layout interface. The default is the Define Layout page flow, which guides you through multiple pages to enter the layout properties. Alternatively, your administrator can enable the Define Layout page, which lets you enter all the layout properties in a single page after you have selected the integrator to which the layout applies.
From the Oracle E-Business Suite navigator, select Define Layout. This menu item may be under the Desktop Integration responsibility, or it may be located under a different responsibility assigned to you by your system administrator.
Select the integrator. Oracle Web Applications Desktop Integrator displays any existing layouts for the integrator.
Choose Create to create a new layout, or select an existing layout and choose Update to modify it.
To create a new layout based on an existing layout, select the existing layout and choose Duplicate. Enter a name for the new layout and choose Apply.
To delete a layout that you no longer need, select the layout and choose Delete. Then choose OK in the confirmation page.
Enter a Layout Name and specify the Number of Headers to place across the top of the document.
If your document has one header, all fields that you identify as header fields will display in a single list. If your layout includes numerous header fields, consider defining multiple headers to place them horizontally across the top of your document.
Determine the fields to be included in the layout, their placement, and their default values. The page displays a list of the required fields for this integrator and a list of optional fields.
Some integrators offer the ability to display a graph of data from the rows in the lines region. In this case the Include Graph of Lines Data option appears in this page. Optionally select this option to specify that Oracle Web Applications Desktop Integrator should generate a graph automatically when the document is first downloaded. For example, you might want to select this option if the integrator has a content defined to populate the document with data during the initial download. If you do not select this option, then users must use one of the graph buttons from the Oracle ribbon tab in Microsoft Excel to generate a graph in their documents after the initial download. See: Viewing Graphs.
All required fields must be included in your layout. Include optional fields by selecting the Select box. The following table describes the options available for the fields in your layout:
Layout Field Options
| Fields | Description |
|---|---|
| Placement | Defines the location of the field on the spreadsheet. You can select Context, Header, or Line. If you specified that the document has multiple headers, select the one in which you want the field to appear, such as Header 1, Header 2, or Header 3. |
| Default Value | Some fields may have predefined default values, or you can enter the default value here, using the appropriate format for the default type. For context fields, you should always define a default value.
Note: For a field that contains a date value, the format of the default value should match the date format defined for the integrator in the integrator LDT file. |
| Default Type | Indicates how Oracle Web Applications Desktop Integrator should obtain the default value. |
The following table describes the available default types.
Default Types
| Default Type | Description |
|---|---|
| None | If you do not want to specify any default value, select this type and leave the Default Value field blank. None is the default setting for the Default Type option itself, for all fields in the layout. For context fields, you should always change this setting to specify a default type and a default value. |
| Constant | Select this type to use the text entered in the Default Value field as the default value in the spreadsheet. |
| Environment | Select this type to reference an environment variable when setting a default for a field. If you select this type, enter one of the following values in the Default Value field:
|
| Parameter | Select this type to reference a parameter that your system administrator stores in the form function (Self Service Link) used to access the Create Document interface. The parameters that can be referenced are specific to each integrator. See the product-specific documentation for the valid values to enter in the Default Value field for this default type. |
| SQL | Select this type to run a SQL statement to determine the default for the field. Oracle Web Applications Desktop Integrator runs the SQL statement entered in the Default Value field and automatically populates the spreadsheet with the results. If more than one value is returned from the query, Oracle Web Applications Desktop Integrator uses the first value. You can use the following tokens in the SQL statement that you enter in the Default Value field:
|
| Formula | Select this type to enter an Excel-compatible formula to determine the default value for a field. When you enter the formula in the Default Value field, follow the Excel formula syntax and enclose field names in brackets. For example: [credit]+[debit] Note that referencing the field names rather than the cell names prevents your formulas from being corrupted if the order of the fields is changed in the layout. |
In the Create Layout page, define display properties for the page components. Use this page to mark fields as Read Only, to hide fields, and to move the fields up or down in the display order.
Protect Sheet - Select Yes or No to set the state of the document when downloaded. A protected sheet will allow you to update the data fields but will not allow you to insert rows. Users can change this setting in Microsoft Excel.
Style Sheet - Select a style sheet to apply to the document. See Defining a Style Sheet.
Apply Filters - Select Yes to enable Microsoft Excel filters for the lines region when the document is downloaded. Users can change this setting in Microsoft Excel by selecting the Filters button in the Oracle ribbon tab.
Image - If you want to display a branding image in the documents created with this layout, enter the file name of the image. For example, MyCompanyImage.gif. Ensure that you have placed the image in the OA_MEDIA virtual directory. The image you define here for the layout overrides any image specified at the style sheet level or in the Corporate Branding Image for Oracle Applications profile option. See: Implementing Branding Images.
Graph Properties
Some integrators offer the ability to display a graph of data from the rows in the lines region. In this case you can specify the following properties to define how the graph should appear by default. These properties apply both to automatically generated graphs and to graphs that users add manually.
Enter a graph Title.
Select the Graph Type: Area, Bar, Column, Line, or Pie.
Select the Subtype: 3D (three-dimensional) or 2D (two-dimensional).
For 2D graphs, enter the titles for the Category (X) Axis and the Series (Y) Axis.
For 3D graphs, enter the titles for the Category (X) Axis, the Series (Y) Axis, and the Value (Z) Axis.
Enter the Category Columns. The data from these columns will be represented on the X axis. Separate each column name from the next with a comma. Each name entered must be a valid column name occurring in the layout definition.
Enter the Series Columns. The data from these columns will be represented on the Y axis. Separate each column name from the next with a comma. Each name entered must be a valid column name occurring in the layout definition.
Tip: Users can modify the graph within the downloaded document by selecting Modify Graph Type or Modify Graph Options from the Oracle ribbon tab in Microsoft Excel. See: Viewing Graphs.
Context Field Properties
Prompt Span - enter the number of columns that the field prompt will span.
Important: For context and header fields, you set the number of columns for the Prompt, Hint, and Data to span. You set the column widths for the fields at the Line level. Therefore, when setting the column spans for a header or context field, be aware that the width of a column is determined by the width of the line fields in the spreadsheet. See Design Considerations.
Hint Span - enter the number of columns for the field hint to span. The hint for a field can include the following:
* - indicates the field is required.
List - indicates that the field provides a list of values. Double-click the field to invoke the list.
Data type - the data type for each field is always displayed. For example, Text or Number.
Data Span - enter the number of columns for the data to span.
Move Up and Move Down - optionally use these arrows to change the order of the fields.
Hide - select this option if you want the field hidden on the spreadsheet.
Header Field Properties
Prompt Span - enter the number of columns that the field prompt will span.
Important: For context and header fields, you set the number of columns for the Prompt, Hint, and Data to span. You set the column widths for the fields at the Line level. Therefore, when setting the column spans for a header or context field, be aware that the width of a column is determined by the width of the line fields in the spreadsheet. See Design Considerations.
Title - optionally enter a title for the header.
Hint Span - enter the number of columns for the field hint to span. The hint for a field can include the following:
* - indicates the field is required.
List - indicates that the field provides a list of values. Double-click the field to invoke the list.
Data type - the data type for each field is always displayed. For example, Text or Number.
Data Span - enter the number of columns for the data to span.
Move Up and Move Down - optionally use these arrows to change the order of the fields.
Hide - select this option if you want the field hidden on the spreadsheet.
Read Only - select this option if you want the field to display as a nonupdateable, read-only field.
Line Region Properties
Data Entry Rows - enter the number of blank rows to display when the document is generated. Users can add more rows once the document is downloaded to Excel.
Note: The maximum number of data entry rows is limited by the number of rows that Microsoft Excel allows in a worksheet. When you use Microsoft Excel 2007 and higher with Oracle Web Applications Desktop Integrator Release 12.2.6 and higher, the maximum value for the Data Entry Rows field is 1,048,000 rows.
If your site is not using the OOXML format, use caution when specifying the Data Entry Rows setting. Specifying a large number of data entry rows significantly increases the time required to create and upload Oracle Web Applications Desktop Integrator documents.
If your site is using the OOXML format, then the document creation and upload processing is performed on the server. In this case the processing is significantly faster than if you do not use OOXML, but requires a larger server heap memory. You should review the server heap memory setting to ensure it is appropriate for this configuration.
Move Up and Move Down - optionally use these arrows to change the order of the fields.
Read Only - select this option if you want the field to display as a nonupdateable, read-only field.
Width - enter the width of the field in characters.
Frozen Pane - use this option to set the fields that you want to remain visible while users scroll horizontally across the spreadsheet. All fields before the field for which you select the Frozen Pane option will be fixed in the spreadsheet and remain visible. Select the first field in the list if you do not want a frozen pane.
From the Oracle E-Business Suite navigator, select Define Layout. This menu item may be under the Desktop Integration responsibility, or it may be located under a different responsibility assigned to you by your system administrator.
Select the integrator. You can optionally enter a complete or partial layout name to search for layouts whose names match that value. Leave the layout name blank to search for all existing layouts for the integrator. Then choose Go. Oracle Web Applications Desktop Integrator displays the layouts that match your search criteria.
Note: The number of integrators displayed in the list of values for the Integrator Name field is limited by the FND: View Object Max Fetch Size profile option. By default, this profile option is set to 200 records. If the list of values does not display all your integrators, set the FND: View Object Max Fetch Size profile option to a value equal to or higher than the number of integrators defined in your instance. For more information about this profile option, see the Oracle Application Framework Developer's Guide, available from My Oracle Support Knowledge Document 1315485.1.
Choose the action you want to perform.
To define a new layout, choose Create Layout.
To modify an existing layout, choose the Update icon for that layout.
To create a new layout based on an existing layout, choose the Duplicate icon for the existing layout.
To delete a layout that you no longer need, choose the Delete icon for that layout and confirm the deletion in the warning dialog.
If you chose to create, update, or duplicate a layout, continue with the following steps to define the layout properties in the Create Layout, Update Layout, or Duplicate Layout page, respectively.
Enter a name for the layout.
Select a style sheet to apply to the documents created with this layout. See Defining a Style Sheet.
If you want to display a branding image in the documents created with this layout, enter the file name of the image. For example, MyCompanyImage.gif. Ensure that you have placed the image in the OA_MEDIA virtual directory. The image you define here for the layout overrides any image specified at the style sheet level or in the Corporate Branding Image for Oracle Applications profile option. See: Implementing Branding Images.
Optionally select the Protect Sheet option to set the state of the document to protected when it is first downloaded. A protected sheet lets users update the data fields but does not let them insert rows. Users can change this setting in Microsoft Excel.
Optionally select the Apply Filters option to enable Microsoft Excel filters for the lines region when the document is first downloaded. Users can change this setting in Microsoft Excel by selecting the Filters button in the Oracle ribbon tab.
Some integrators offer the ability to display a graph of data from the rows in the lines region. In this case the Graph region appears in this page.
Optionally select the Automatically Generate Graph option to specify that Oracle Web Applications Desktop Integrator should generate a graph automatically when the document is first downloaded. For example, you might want to select this option if the integrator has a content defined to populate the document with data during the initial download. If you do not select this option, then users must use one of the graph buttons from the Oracle ribbon tab in Microsoft Excel to generate a graph in their documents after the initial download. See: Viewing Graphs.
Specify the following properties to define how the graph should appear by default. These properties apply both to automatically generated graphs and to graphs that users add manually.
Enter a graph title.
Select the graph type: Area, Bar, Column, Line, or Pie.
Select the subtype: 3D (three-dimensional) or 2D (two-dimensional).
For 2D graphs, enter the titles for the Category (X) axis and the Series (Y) axis.
For 3D graphs, enter the titles for the Category (X) axis, the Series (Y) axis, and the Value (Z) axis.
Additionally, when you set the properties for the line fields in the Line region of this page, you should specify the fields that will be represented on the X axis and the fields that will be represented on the Y axis. See step 19.
Tip: Users can modify the graph within the downloaded document by selecting Modify Graph Type or Modify Graph Options from the Oracle ribbon tab in Microsoft Excel. See: Viewing Graphs.
In the Context region, enter the following overall properties for the context fields.
Prompt Span - Enter the number of columns that the field prompt will span.
Important: For context and header fields, you set the number of columns for the prompt, hint, and data to span. You set the column widths for the fields at the line level. Therefore, when setting the column spans for a header or context field, be aware that the width of a column is determined by the width of the line fields in the spreadsheet. See Design Considerations.
Hint Span - Enter the number of columns that the field hint will span. When determining the width required for the hint, note that the hint for a field can include the following:
*- Indicates that the field is required.
List - Indicates that the field provides a list of values. The user can double-click the field to invoke the list.
Data type - The data type for each field is always displayed. For example, Text or Number.
Data Span - Enter the number of columns that the data will span.
Specify the fields to include as context fields in the layout. Choose Add Optional Fields to add available fields to the context. You can also move fields from a header or from the Line region to the context.
If you do not want a field to appear in the context, you can move it to a header or to the Line region, or, if the field is optional, you can remove it from the layout.
Set the properties for each context field.
Optionally select the Hide option to hide the field in the spreadsheet.
Enter a default value for the field, using the appropriate format for the default type. Some fields may have a predefined default value specified in the integrator definition. You should always define a default value for context fields.
Note: For a field that contains a date value, the format of the default value should match the date format defined for the integrator in the integrator LDT file.
Select the default type that indicates how Oracle Web Applications Desktop Integrator should obtain the default value. The following table describes the available default types.
Default Types
| Default Type | Description |
|---|---|
| None | If you do not want to specify any default value, select this type and leave the Default Value field blank. If you do not want to specify any default value, select this type and leave the Default Value field blank. None is the default setting for the Default Type option itself, for all fields in the layout. For context fields, you should always change this setting to specify a default type and a default value. |
| Constant | Select this type to use the text entered in the Default Value field as the default value in the spreadsheet. |
| Environment | Select this type to reference an environment variable when setting a default for a field. If you select this type, enter one of the following values in the Default Value field:
|
| Parameter | Select this type to reference a parameter that your system administrator stores in the form function (Self Service Link) used to access the Create Document interface. The parameters that can be referenced are specific to each integrator. See the product-specific documentation for the valid values to enter in the Default Value field for this default type. |
| SQL | Select this type to run a SQL statement to determine the default for the field. Oracle Web Applications Desktop Integrator runs the SQL statement entered in the Default Value field and automatically populates the spreadsheet with the results. If more than one value is returned from the query, Oracle Web Applications Desktop Integrator uses the first value. You can use the following tokens in the SQL statement that you enter in the Default Value field:
|
| Formula | Select this type to enter an Excel-compatible formula to determine the default value for a field. When you enter the formula in the Default Value field, follow the Excel formula syntax and enclose field names in brackets. For example: [credit]+[debit] Note that referencing the field names rather than the cell names prevents your formulas from being corrupted if the order of the fields is changed in the layout. |
The context fields will appear in the same order in the spreadsheet as they do in the list in this page. Use the Move Up and Move Down icons to place the fields in the order you want.
If you do not want a listed field to appear in the context, select the Move To icon and select the part of the layout where you want to move the field, either a header or the Line region. Alternatively, if the field is optional, select the Remove icon to remove it from the layout.
In the Headers region, select the number of headers to include in the layout and choose Apply. The page then displays a region to define each header, identified as Header 1, Header 2, Header 3, and so on. You can include up to 10 headers. If you do not want to include a header, select 0.
If your document has one header, all fields that you identify as header fields will be displayed in a single vertical list. If you define multiple headers, they are displayed in multiple lists placed horizontally across your document. If your layout includes numerous header fields, consider defining multiple headers to make it easier for users to see all the header fields.
In each header region, enter the following overall properties for the header.
Title - Optionally enter a title for the header.
Prompt Span - Enter the number of columns that the field prompt will span.
Important: For context and header fields, you set the number of columns for the prompt, hint, and data to span. You set the column widths for the fields at the line level. Therefore, when setting the column spans for a header or context field, be aware that the width of a column is determined by the width of the line fields in the spreadsheet. See Design Considerations.
Hint Span - Enter the number of columns that the field hint will span. When determining the width required for the hint, note that the hint for a field can include the following:
*- Indicates that the field is required.
List - Indicates that the field provides a list of values. The user can double-click the field to invoke the list.
Data type - The data type for each field is always displayed. For example, Text or Number.
Data Span - Enter the number of columns that the data will span.
Specify the fields to include in this header. Choose Add Optional Fields to add available fields to the header. You can also move fields from the context, from another header, or from the Line region to this header.
If you do not want a field to appear in this header, you can move it to the context, to another header, or to the Line region. Alternatively, if the field is optional, you can remove it from the layout.
Set the properties for each header field.
Optionally select the Read Only option if you want the field to appear as a nonupdatable, read-only field.
Optionally select the Hide option to hide the field in the spreadsheet.
Optionally enter a default value for the field, using the appropriate format for the default type. Some fields may have a predefined default value specified in the integrator definition.
Note: For a field that contains a date value, the format of the default value should match the date format defined for the integrator in the integrator LDT file.
Select the default type that indicates how Oracle Web Applications Desktop Integrator should obtain the default value. The available default types are the same as those for the context fields.
The header fields will appear in the same order in the spreadsheet as they do in the list in this page. Use the Move Up and Move Down icons to place the fields in the order you want.
If you do not want a listed field to appear in this header, select the Move To icon and select the part of the layout where you want to move the field, either the context, another header, or the Line region. Alternatively, if the field is optional, select the Remove icon to remove it from the layout.
In the Line region, in the Data Entry Rows field, enter the number of blank rows to display when the document is generated. Users can add more rows once the document is downloaded to Microsoft Excel.
Note: The maximum number of data entry rows is limited by the number of rows that Microsoft Excel allows in a worksheet. When you use Microsoft Excel 2007 and higher with Oracle Web Applications Desktop Integrator Release 12.2.6 and higher, the maximum value for the Data Entry Rows field is 1,048,000 rows.
If your site is not using the OOXML format, use caution when specifying the Data Entry Rows setting. Specifying a large number of data entry rows significantly increases the time required to create and upload Oracle Web Applications Desktop Integrator documents.
If your site is using the OOXML format, then the document creation and upload processing is performed on the server. In this case the processing is significantly faster than if you do not use OOXML, but requires a larger server heap memory. You should review the server heap memory setting to ensure it is appropriate for this configuration.
Specify the fields to include in the lines in the layout. Choose Add Optional Fields to add available fields to the lines. You can also move fields from the context or from a header to the lines.
If you do not want a field to appear in the lines, you can move it to the context or to a header, or, if the field is optional, you can remove it from the layout.
Set the properties for each line field.
Optionally select the Read Only option if you want the field to appear as a nonupdatable, read-only field.
Enter the width of the field in characters.
Use the Frozen Pane option to determine which fields remain visible while users scroll horizontally across the spreadsheet. All fields before the field for which you select the Frozen Pane option will be fixed in the spreadsheet and remain visible. If you do not want a frozen pane, then select the first field in the list.
Optionally enter a default value for the field, using the appropriate format for the default type. Some fields may have a predefined default value specified in the integrator definition.
Note: For a field that contains a date value, the format of the default value should match the date format defined for the integrator in the integrator LDT file.
Select the default type that indicates how Oracle Web Applications Desktop Integrator should obtain the default value. The available default types are the same as those for the context fields.
If this integrator offers the ability to display a graph, then the Graph Location option appears to let you specify where the data from the field will be represented in the graph by default.
Category - The data from this field will be represented on the Category (X) axis.
Data - The data from this field will be represented on the Series (Y) axis.
You can include multiple fields on each axis. If you do not want a field to be included in the graph, leave the Graph Location field blank. Ensure that you have also specified the related graph properties described in step 9.
The line fields will appear in the same order in the spreadsheet as they do in the list in this page. Use the Move Up and Move Down icons to place the fields in the order you want.
If you do not want a listed field to appear in the lines, select the Move To icon and select the part of the layout where you want to move the field, either the context or a header. Alternatively, if the field is optional, select the Remove icon to remove it from the layout.
Choose Apply to save the layout definition.
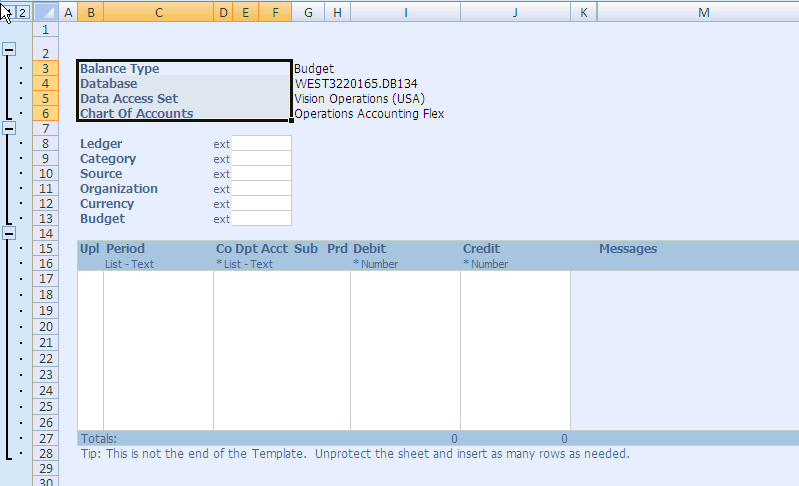
The width of columns in a spreadsheet is set at the line item level. Consequently, when setting the column spans for context and header fields, you must consider the widths of the corresponding line item columns. The following example shows the layout specifications for the Context fields and how these specifications are rendered in the actual document. The Context Prompt Span is defined as 5 columns and the Context Data Span is defined as 4 columns. Note that in the resulting spreadsheet, the context prompts span the five columns B through F.
Column B is the automatically generated Upload line item column.
Column C is the Period line item column.
Columns D, E, and F are key flexfield segment columns.
The context data following the context prompts span the 4 columns G through J.
Note: The examples in this section show the layout specifications defined in the simplified Define Layout page. The layout properties appear slightly differently in the Define Layout page flow, but you can define the same properties in both interfaces.
Example 1 - Resulting Spreadsheet
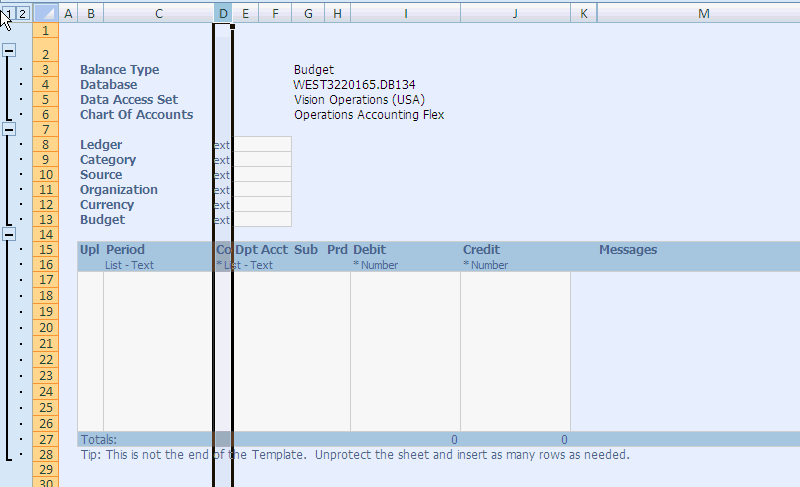
The next example shows the Hint Span for the Header set to 1. In this case because the column that the hint falls into is narrow, the full hints are not displayed. To display the full hint text in this example, expand the Hint Span to 3.
Example 2 - Resulting Spreadsheet
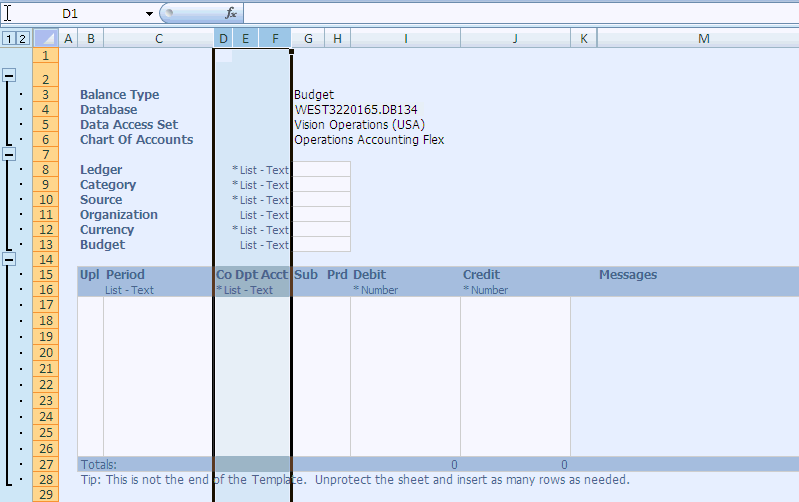
The following example shows the same document after increasing the Header Hint Span to 3, to accommodate the full hint text.
Example 3 - Resulting Spreadsheet
Note that achieving the desired layout might require several iterations, because changing the column spans for the fields in the first header will affect the placement of the fields in subsequent headers. For example, if changing the Hint Span for Header 1 moves the hint text for Header 2 to a narrower column, then you should also change the Hint Span for Header 2 to accommodate that hint text.