Pegging is a process that the planning engine uses to link:
Supplies to demands: All the way up to the top-level independent demand.
Demands to supplies: All the way down to the bottom-level purchased component supply.
Use pegging to:
Trace a purchased component or subassembly shortage to the sales orders and forecasts that are affected.
Prioritize critical material and capacity resources.
Analyze the impact of changing a supply or demand
Pegging plays a major role in determining the sequence in which demands are satisfied. For some pegging modes, the planning engine:
Groups supplies and demands into time windows
Sorts supplies by type
Pegs by demand priority or randomly within time windows
This section discusses:
Standard pegging: Standard pegging groups demands into windows and supplies by type, then pegs by priority within window. It provides a limited amount of prioritization at the day level (the window size is always one day).
Priority pegging: Priority pegging pegs high priority demands first to on-hand and firm supplies then continues with other existing and non-firm supplies. It controls the trade-off between holding inventory or satisfying lower priority demands.
FIFO pegging: FIFO pegging pegs demands to supplies on a day-by-day basis. It is the pegging process with the least load on the system.
Priority/FIFO pegging: The planning engine uses a combination of priority pegging and FIFO pegging methods where it does not prioritize beyond the firm supplies. The load on the system is less than the load from priority pegging.
Enabling pegging checklist
Viewing pegging information
The actual date that a demand is satisfied is a function of the detailed scheduling process. There is no guarantee that high priority orders are satisfied on time.
In performing the pegging process, the planning engine selects demands and locates supplies to peg those demands to. Therefore, we say that the pegging process pegs demands to supplies.
When some people think of pegging, they think of supplies pegged to demands. For example, if you are using hard pegging with Oracle Project Manufacturing, it reserves the supply for the demand.
When discussing the results of the pegging process, you can correctly say either that demands peg to supplies or that supplies peg to demands. The diagrams in this section use arrows which indicate the supplies that peg to particular demands.
To use pegging you must enable it for the items and for the plan. The planning engine pegs in several ways (pegging modes). For certain modes, you specify information to instruct the planning engine.
The planning engine pegs each item after the netting process. It begins with all of the items in the highest bill of material level and proceeds level by level to the lowest bill of material level.
The planning engine attempts to minimize substitution at the expense of crossing organizations and uses substituted on-hand or scheduled receipts before creating planned orders. For example:
Item A is a saleable item
Item B is a substitute for item A
In organization M1, there is:
Demand for item A, due on day 10, quantity 100, priority 1
Demand for item A, due on day 20, quantity 70, priority 2
On-hand supply for item A, quantity 40
On-hand supply for item B, quantity 70
In organization M2, there is:
On-hand supply for item A, quantity 60
On-hand supply for item B, quantity 40
The planning engine pegs the demand in organization M1, for item A, due on day 10, quantity 100, priority 1 to:
Organization M1, on-hand supply for item A, quantity 40
Organization M2, on-hand supply for item A, quantity 60
Demand satisfied date is day 10
It crosses organizations to avoid substituting
The planning engine pegs the demand in organization M1 for item A, due on day 20, quantity 70, priority 2 to:
Organization M1, on-hand supply for item B, quantity 70
Demand satisfied date is today
There is no supply for the requested item in any organization; it substitutes to use on-hand before creating planned orders
The planning engine passes independent demand priorities to discrete job and planned order dependent demands to which they peg. Planned order dependent demands have lower priority than discrete job dependent demands at the same bill of material level.
The planning engine performs pegging for product family items regardless of the setting of their item attribute Pegging
Setup
For the planning engine to plan reservations, select plan option Net Reservations.
Snapshot
The planning engine snapshots these reservations for these plan types:
Unconstrained, Constrained (Classic), and Constrained with Detailed Scheduling: On hand reservations against sales orders
Constrained without detailed scheduling: All reservations that collect. See Value Chain Planning Collections Implementation Guide, Running Collections, Overview, Details About What is Collected, Reservations.
Processing
In the source system, you can reserve:
One supply to multiple demands
One demand against multiple supplies
If a supply quantity is partially reserved to demands, the planning engine can peg the unreserved quantity to other demands.
If a demand quantity is partially reserved against supplies, the planning engine can peg the unreserved quantity to other supplies.
The reservation information collected from the source is an input pegging relationship in ASCP. The planning engine pegs other supplies and demands around these reservation relationships. Therefore, you might notice these patterns in the plan output:
Non FIFO pegging output: The planning engine appears to peg out of order
Reschedules: Material from one work order is reserved for another work order. If the planning engine reschedules one of the work orders, it also needs to reschedule the other work order.
Quantity change: If the reserved quantity is higher than the supply or demand quantities, the planning engine changes the reserved quantity to whichever entity has the smaller quantity - the supply or the demand.
"In a supply-demand reservation, the planning engine changes the reserved quantity in cases where the reserved quantity is greater than the supply or demand quantity. In such cases (which represents a data inconsistency), the planning engine will reset the reserved quantity to a value equal to minimum [ demand quantity, supply quantity ]
Ignore reservation: The planning engine ignores a reservation if one of the entities in the relationship is missing.
Analysis
In Planner Workbench Supply / Demand window, see these fields:
Reserved: Typically No. If a supply has some quantity reserved to a demand or a demand has some quantity reserved against a supply, this field is Yes.
Reserved Quantity: The sum of the reserved quantity across all the demands that a supply is reserved to or all the supplies that a demand is reserved against.
In the pegging tree, the reserved quantities of the individual supplies to a demand or the reserved quantities of the individual demands against a supply show as attribute Reserved Quantity.
Purchase Order Reservations Processing
This is how the planning engine processes reservations created between purchase order and internal requisition supplies and demands:
If none of the purchase order has entirely shipped, the planning engine does not change the purchase order reservation.
If the purchase order quantity is entirely in transit or entirely in receiving, the planning engine applies the reservation originally created originally against the purchase order to the intransit supply, then to the purchase order in receiving supply.
If the purchase order has been partially shipped, the planning engine respects the reservation across all the supplies that make up the purchase order.
For example:
Purchase order of quantity 100 is reserved to a sales order of quantity 100.
30 units of the purchase order are not shipped.
30 units of the purchase order are in transit.
40 units of the purchase order are in receiving.
The planning engine sees each of these quantities as a supply and pegs them all to the sales order.
If you have a purchase order reserved to multiple sales orders, the planning engine uses FIFO pegging for the purchase order and the sales order.
For example, this is the status of a purchase order of quantity 100:
Supply type: Purchase order, Due date: Day 5, Quantity: 30
Supply type: In transit, Due date: Day 8, Quantity: 30
Supply type: In receiving, Due date: Day 10, Quantity: 40
Teo sales orders have reservations against the purchase order:
Due date: Day 12, Quantity: 50
Due date: Day 15, Quantity: 50
The planning engine pegs:
30 units of purchase order on Day 5 to the sales order on Day 12
20 units of in transit on Day 8 to the sales order on Day 12
10 units of in-transit supply on Day 8 to the sales order on Day 15
40 units of in receiving on Day 10 to the sales order on Day 15
This table shows the pegging modes and the settings that you use to enable them.
| Pegging Mode | Plan Option - Priority Pegging | Profile Option - MSC: Use FIFO Pegging |
|---|---|---|
| Standard | Cleared | No |
| Priority | Selected | No |
| FIFO | Cleared | Yes |
| Priority/FIFO | Selected | Yes |
When the pegging process is processing an end-item product substitution, it does not attend to the following profile options, regardless of the pegging mode. The process performs the pegging for these demands immediately following the item substitution:
MSC: Demand Window Size
MSC: Peg by Product Supplies
MSC: Supply Window Size
MSO: Firm Supply Allocation Window (Forwards Days)
MSO: Firm Supply Allocation Window (Backwards Days)
MSO: Use Firm Supplies Before Creating Planned Orders
The standard pegging process makes two passes through the demands and supplies.
The planning engine groups demands into daily windows. It does not use profile option MSO: Demand Window Size. The first window starts at the first demand date and the last window ends at the end of the planning horizon.
For example, the demand window size is 1 day, the first demand is due on day 5. The first demand window is from day 5 to day 5, the second demand window is from day 6 to day 6, and the third demand window is from day 7 to day 7.
Demands in each window are sorted by demand priority in ascending order.
The planning engine groups supplies into daily windows. It does not use profile option MSO: Supply Window Size. The first window starts at the first supply availability date and the last window ends at the end of the planning horizon.
For example, the supply window size is 1 day, the first supply is available on day 7. The first supply window is from day 7 to day 7, the second supply window is from day 8 to day 8, and the third supply window is from day 9 to day 9.
Supplies in each window are sorted by type using the following order:
Firm supplies
On-hand
Receipt shipment, intransit shipment, payback supply (Oracle Project Scheduling)
Work order (firm), job by-product supply (firm), purchase order (firm), non-standard jobs, non-standard job by-product supply (always considered firm)
Purchase requisition (firm)
2. Existing supplies
Work order (non-firm), job by-product Supply (non-firm), repetitive schedule, repetitive schedule by-product supply, flow schedule, flow schedule by-product supply, purchase order (non-firm)
Purchase requisition (non-firm)
Planned supplies
Planned order (firm), planned order by-product supply (firm). You can raise the pegging priority of firm planned orders by releasing them.
Planned order (non-firm), planned order by-product supply (non-firm)
The supplies in each type are sorted as follows:
On-hand: Lot expiration date and then quantity in ascending order to use expiring lots first. A demand pegging to an expiring lot must have its demand date earlier than the lot expiration date; therefore, some expiring lots may not peg.
Firm: By date in ascending order within each type.
Non-firm: By quantity in ascending order within each type.
The planning engine begins from the first demand window and pegs demands by demand priority to supplies of the first supply window. If necessary, it continues the pegging process with the next supply window.
As all demands in the each demand window are pegged, it moves to the next demand window and pegs as it did in the first demand window
Unpegged supplies are posted to excess.
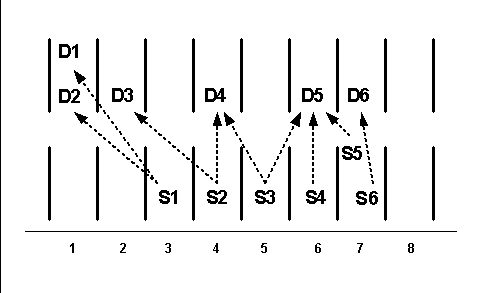
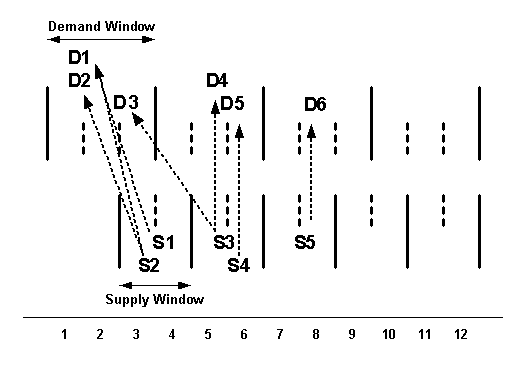
In this example, demands D1 and D2 are sorted by priority in ascending order and supplies S5 and S6 are sorted by type. Pegged entities are connected by arrows.
Pegged Entities
This example shows standard pegging for two items. It begins with various settings and then shows the pegging for each item.
Profile option MSC: Use FIFO Pegging is No.
Plan option Peg Supplies by Demand Priority: Cleared.
In standard pegging, the planning engine uses 1 as the value for MSO: Demand Window Size and MSO: Supply Window Size and ignores the entered values.
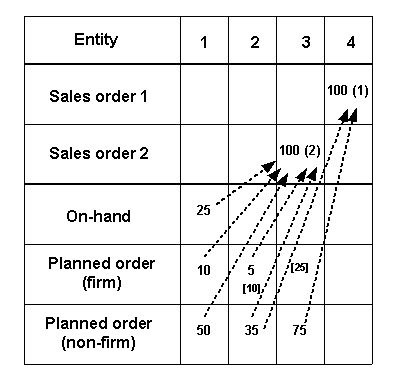
This diagram shows the demands, supplies, and pegging information for item A101. Demand priorities are in parentheses, pegged entities are connected by arrows, and split supply quantities are in brackets.
The first demand window starts on day 3 at the first demand date.
Supplies in the first supply window [day 1] are pegged in the following order:
On-hand of quantity 25 on day 1 and demand quantity of 100 on day 3
Firm planned order of quantity 10 on day 1 and demand of quantity 100 on day 3
Non-firm planned order of quantity 50 on day 1 and demand of quantity 100 on day 3
Supplies in the second supply window [day 2] are pegged in the following order:
Firm planned order of quantity 5 on day 2 and demand of quantity 100 on day 3
Non-firm planned order of quantity 35 on day 2 (for partial quantity 10) and demand of quantity 100 on day 3
Non-firm planned order of quantity 35 on day 2 (for partial quantity 25) and demand of quantity 100 on day 4
Supply in the third supply window [day 3] is pegged as non-firm planned order of quantity 75 on day 3 and demand of quantity 100 on day 4
Pegged Entities
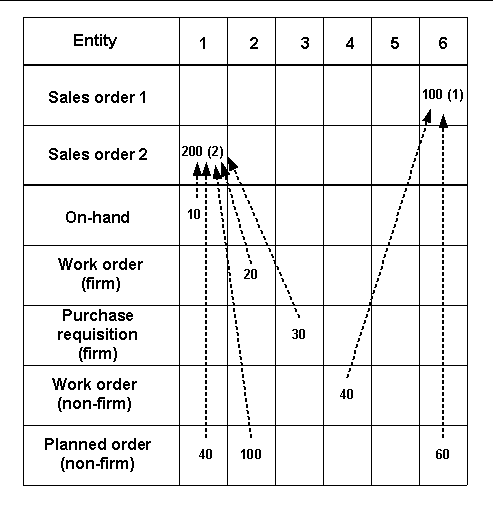
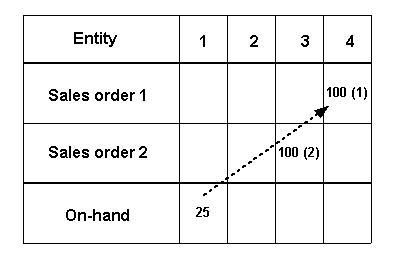
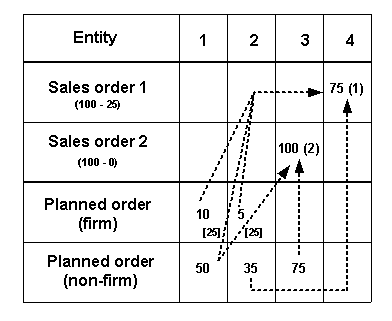
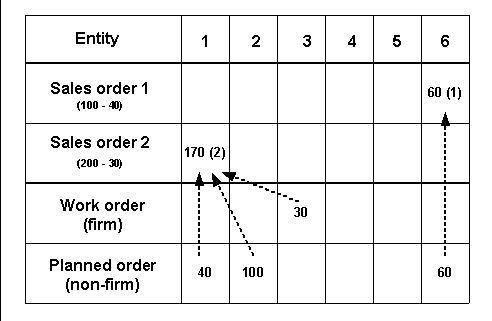
This table shows the demands, supplies, and pegging information for item A102. Demand priorities are in parentheses and pegged entities are connected by arrows.
Supplies in the first supply window [day 1] are pegged in the following order:
On-hand of quantity 10 on day 1 and demand of quantity 200 on day 1
Non-firm planned order of quantity 40 on day 1 and demand of quantity 200 on day 1
Supplies in the second supply window [day 2] are pegged in the following order:
Firm work order of quantity 20 on day 2 and demand of quantity 200 on day 1
Non-firm planned order of quantity 100 on day 2 and demand of quantity 200 on day 1
Supply in the third supply window [day 3] is pegged as firm purchase requisition of quantity 30 on day 3 and demand of quantity 200 on day 1
Supply in the forth supply window [day 4] is pegged as non-firm work order of quantity 40 on day 4 and demand of quantity 100 on day 6
Supply in the sixth supply window [day 6] is pegged as non-firm planned order of quantity 60 on day 6 and demand of quantity 100 on day 6
Pegged Entities
The priority pegging process makes three passes through the demands and supplies.
The planning engine starts with the demand of highest priority as specified by the plan's demand priority rule. It scans backwards the number of days in the site or item-specific firm supply allocation window (profile option MSO: Firm Supply Allocation Window (Backward days) and finds the first firm supply quantity to peg the demand to.
The planning engine scans backward and finds supplies. It organizes and pegs them as follows:
Sorts on-hand by the lot expiration date and then quantity in ascending order. Pegs demand to on-hand before other firm supplies of day 1 when the firm supply allocation window includes day 1.
Firm supplies are not sorted on any given date.
If you want firm planned orders included in the firm supply allocation window, set profile option MSC: Include Firm Planned Orders In Firm Allocation Window to Yes.
If it cannot find enough firm supply quantity to satisfy the entire demand quantity, it scans forwards the number of days in the site or item-specific firm supply allocation window (profile option MSO: Firm Supply Allocation Window (Forward days)) to find supplies to peg the demand to.
The pass ends when the demand is completely pegged to firm supplies or all firm supplies in the firm supply allocation windows are exhausted.
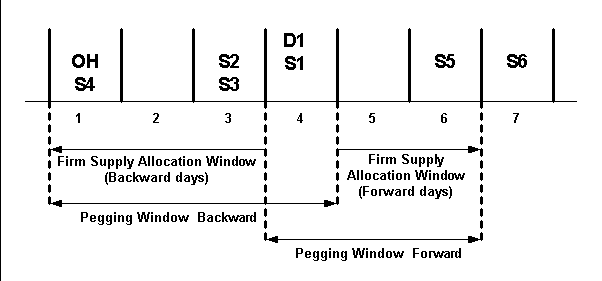
This diagram shows an example of the first pass:
Demand D1 on day 4 is the highest priority demand
MSO: Firm Supply Allocation Window (Backward days) is 3
MSO: Firm Supply Allocation Window (Forward days) is 2
Supplies S2 and S3 on day 3 are not sorted
OH (on-hand) is sorted before supply S4 on day 1
The order of supplies for pegging to demand D1 is:
Backward: S1, S2 and S3 randomly; OH; and S4
Forward: S5; D1 cannot peg to S6
Priority Pegging First Pass Example
For the remaining demands and supplies, the planning engine groups all demands into windows by using profile option MSO: Demand Window Size. The first window starts at the first demand date and ends after the number of days in the window size. The second window starts at the end of the first window and ends after the number of days in the window size. The last window ends at the end of the planning horizon.
For example, the demand window size is 50 days and the first demand date is due on day 1. The first demand window is from day 1 to day 49 and the second demand window is from day 50 to day 99.
Demands in each window are sorted by demand priority in ascending order.
The planning engine groups all supplies into windows by using profile option MSO: Supply Window Size. The first window starts at the first available supply date and ends after the number of days in the window size. The second window starts at the end of the first window and ends after the number of days in the window size. The last window ends at the end of the planning horizon.
For example, the supply window size is 50 days and the first supply is available on day 1. The first supply window is from day 1 to day 49 and the second supply window is from day 50 to day 99.
It sorts supplies in each window by type in the same manner as the standard pegging first pass.
The planning engine uses the standard pegging second pass.
This diagram shows an example of the third pass:
MSO: Demand Window Size = 3
MSO: Supply Window Size = 2
Demands are sorted by priority in each demand window and supplies are sorted by type and date or quantity in each supply window
Note that:
Demand D1 is pegged to multiple supplies S1 and S2
Demands D3 and D4 both peg to supply S3
Pegged entities are connected by arrows
Priority Pegging Third Pass Example
You can set the firm supply allocation window in these ways:
Site level: Use profile options MSO: Firm Supply Allocation Window (Backward days) and MSO: Firm Supply Allocation Window (Forward days) for all items.
Item level: Use Cumulative Manufacturing Lead Time (make items) or Processing Lead Time (buy items) and the profile option MSO: Multiplier to Derive Supply Allocation Window to calculate an item specific value for backward calculations only.
If you specify a positive number for the value of profile option MSO: Multiplier to Derive Supply Allocation Window, then the planning engine ignores the profile option MSO: Firm Supply Allocation Window (Backward days). If you specify a zero, negative, or null number for the value of profile option MSO: Multiplier to Derive Supply Allocation Window, then the planning engine uses the profile option MSO: Firm Supply Allocation Window (Backward days).
Oracle Advanced Supply Chain Planning derives a firm supply allocation window for each item based on its item attributes as follows:
Make: Cumulative manufacturing lead-time. Either automatically calculate it or enter it. To automatically calculate it use either the Oracle Bills of Material Compute Lead Time calculation or the Lead Time Rollup concurrent processes.
Buy: Processing lead-time
These are the formulas for the item-specific firm supply allocation window:
Make item: Cumulative manufacturing lead-time * MSO: Multiplier to derive supply allocation window
Buy item: Processing lead-time * MSO: Multiplier to derive supply allocation window
The value is rounded up to the integer. If the cumulative manufacturing lead-time or the processing lead-time is null or 0 and the multiplier is positive, the planning engine uses the item-specific firm supply allocation window which is 0.
For example:
MSC: Multiplier to Derive Supply Allocation Window: 1.2
Cumulative manufacturing lead-times for item A101: 12 days
Cumulative manufacturing lead-times for item A102: 20 days
Firm supply allocation window for item A101: 15 days (12 * 1.2 = 14.4)
Firm supply allocation window for item A102: 24 days (20 * 1.2)
Very small or very large window sizes bring advantages and disadvantages to the results of the pegging process.
Some benefits of small demand window size are:
Lower inventory and inventory carrying cost: Earlier demands are pegged to on-hand instead of higher priority later demands pegging to on-hand.
Decrease in total demand lateness: It is more likely that early demands are satisfied before later demands.
A disadvantage of small demand window size is more late higher priority demands. Lower priority demands are satisfied before higher priority demands and low priority demands for safety stock peg to on-hand.
A benefit of large demand window size is higher priority demands having a higher probability of being satisfied earlier.
Some disadvantages of large demand window size are:
Increased overall demand lateness.
Increased inventory carrying cost as more inventory is held.
When you are sizing the supply window, note that selecting a large window size can result in the planning engine's pegging early demands to firm supplies or non-firm supplies at the end of the window (firm supplies sort by type and date, non-firm supplies sort by type and quantity). This results in increased lateness for the early demands.
This example shows priority pegging for two items. It begins with various settings and then shows the pegging for each item.
Profile option settings:
MSO: Firm Supply Allocation Window (Backward days): 5
MSO: Firm Supply Allocation Window (Forward days): 1
MSO: Multiplier To Derive Supply Allocation Window: 2
MSO: Demand Window Size: 2
MSO: Supply Window Size: 2
MSC: Use FIFO Pegging: No
Plan option Peg Supplies by Demand Priority: Selected.
Item cumulative lead-times:
A101: 2
A102: 1
Item specific firm supply allocation window:
A101: 4 (2 * 2)
A102: 2 (2 * 1)
This diagram shows the demands, supplies, and pegging information for item A101 on the first pass. Demand priorities are in parentheses and pegged entities are connected by arrows. The order of the schedule entities is:
Demand
Pegging to on-hand and firm supplies within the firm supply allocation window. The planning engine starts with the highest priority demand on day 4 going backward and then forward.
Pegging to On-hand and firmed supplies
This diagram shows the demands, supplies, and pegging information for item A101 on the second pass. Demand priorities are in parentheses, pegged entities are connected by arrows, and split supply quantities are in brackets. The order of the schedule entities is:
Demand position after of on-hand and firm supplies within the firm supply allocation window
Pegging to supply outside the firm supply allocation window, firm supplies first
Note that non-firm planned orders are sorted by quantity in ascending order and firm planned orders are sorted by date in ascending order. Therefore, the planning engine:
Pegs the non-firm planned order in bucket 2 for quantity 35 and the higher priority demand in bucket 4. Pegs the non-firm planned order for quantity 35 on day 2 and the higher priority demand on day 4. Pegs the non-firm planned order for quantity 50 on day 1 and both the demand on day 4 (for quantity 25) and the demand on day 3 (for quantity 25).
Pegs the firm planned order for quantity 10 on day 1 and the higher priority demand of day 4.
Pegging of firmed planned order
This table shows the demands, supplies, and pegging information for item A102 on the first pass. Demand priorities are in parentheses and pegged entities are connected by arrows. The order of the schedule entities is:
Demand
Pegging to on-hand and firm supplies within the firm supply allocation window. The planning engine starts with the highest priority demand on day 6 going backward and then forward.
Note that the planning engine pegs to firm jobs and on-hand balances with respect to the firm supply allocation windows. No demand in the first pass pegs to the firm job on day 3 but the demand in bucket 1 for quantity 170 in the second pass does peg to it.
Pegging Entities

This table shows the demands, supplies, and pegging information for item A102 on the second pass. Demand priorities are in parentheses and pegged entities are connected by arrows. The order of the schedule entities is:
Demand position after of on-hand and firm supplies within the firm supply allocation window
Pegging to supply outside the firm supply allocation window, firm supplies first
Pegging to supply outside firm supply
For all demands and supplies, the planning engine:
Pegs demands to supplies day by day. It does not sort each day's supplies and demands.
When there are no more supplies or demands on one day, uses supplies or demands from the next day
At the end of the planning horizon, posts unpegged supplies to excess.
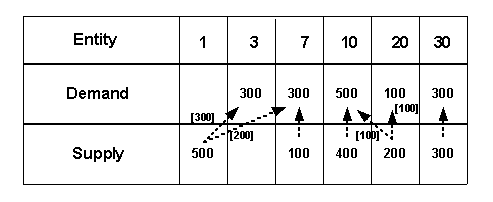
This example shows FIFO pegging. It begins with various settings and then shows the pegging for each item. Daily supplies and demands are not sorted. Pegged entities are connected by arrows and split supply quantities are in brackets.
Profile option MSC: Use FIFO Pegging: Yes
Plan option Peg Supplies by Demand Priority: Cleared
The pegging includes:
The supply of quantity 500 on day 1 and the demand on day 3 for quantity 300 and the demand on day 7 for quantity 200.
The supply of quantity 100 on day 7 and the demand on day 7 for quantity 100.
The supply of quantity 400 on day 10 and the demand on day 10 for quantity 400.
The supply of quantity 200 on day 20 and the demand on day 10 for quantity 100 and the demand on day 20 for quantity 100.
The supply of quantity 300 on day 30 and the demand on day 30 for quantity 300.
Pegging
The priority/FIFO pegging process makes two passes through the demands and supplies.
The planning engine uses the priority pegging first pass.
The planning engine uses the FIFO pegging pass.
This example shows priority/FIFO pegging. It begins with various settings and then shows the pegging for each item. Pegged entities are connected by arrows and split supply and combined demand quantities are in brackets.
Profile options:
MSO: Firm Supply Allocation Window (Backward days): 5
MSO: Firm Supply Allocation Window (Forward days): 1
MSO: Multiplier To Derive Supply Allocation Window: 2
MSC: Use FIFO Pegging: Yes
Plan option Peg Supplies by Demand Priority: Selected.
Item cumulative lead-time: 1
Item specific firm supply allocation window: 2 (2 * 1)
The planning engine pegs firm jobs and on-hand with respect to the firm supply allocation windows. It does not peg the firm work order for quantity 30 on day 3 to any demand in the first pass but to the demand on day 1 for 100 in the second pass.
The planning engine pegs:
The demand for quantity 70 on day 1 to the planned order for quantity 70 on day 1.
The demand for quantity 100 on day 1 to the purchase requisition for quantity 20 on day 2, then to the planned order for quantity 50 on day 2, and then to the work order for quantity 30 on day 3.
Second Pass
This diagram shows the second pass as priority pegging schedules it. The planning engine pegs:
The demand for quantity 70 on day 1 to the purchase requisition for quantity 20 on day 2 and then to the planned order for quantity 50 on day 2.
The demand for quantity 100 on day 1 to the planned order for quantity 70 on day 1 and then to the work order for quantity 30 on day 3.
Third Pass
Enable pegged items: In the Items form, MPS/MRP Planning tabbed region, Pegging field, select any value other than None. For more information, see Oracle Inventory User's Guide.
Enable plan pegging: In the Profile Options form, Main tabbed region, set Enable Pegging. This action enables standard pegging.
Perform this checklist item if you want to use FIFO pegging or priority/FIFO pegging.
Enable plan FIFO pegging: In the Profile Options form, set MSC: Use FIFO Pegging to Yes.
Perform the next three checklist items if you want to use priority pegging or priority/FIFO pegging.
Enable priority pegging: In the Plan Options form, Main tabbed region, select Peg Supplies by Demand Priorities.
Set firm supply allocation windows: In the Profile Options form, attend to the following:
MSO: Firm Supply Allocation Window (Backward days): Number of days for searching backward from the demand date. The default value for this profile option is zero (do not search backwards). If you do not enter a value or enter a negative value, the planning engine also does not search backwards.
MSO: Firm Supply Allocation Window (Forward days): Number of days for searching forward from the demand date. The default value for this profile option is zero (do not search forwards). If you do not enter a value or enter a negative value, the planning engine also does not search forwards.
Set multiplier To Derive Supply Allocation Window: In the Profile Options form, set MSO: Multiplier To Derive Supply Allocation Window. You can use a decimal quantity.
This profile option defaults to not entered, which instructs the planning engine to ignore it and base the backward search of pegging is on profile option MSO: Firm Supply Allocation Window (Backward days). If you enter a negative value or zero, the planning engine also ignores this profile option.
Perform this checklist item if you want to use priority pegging.
Set demand and supply window sizes. In the Profile Options form, attend to the following:
MSO: Demand Window Size: Number of days for grouping demands into windows; it defaults to 1. If you do not enter a value, enter 0, or enter a negative value, the planning engine uses value 1.
MSO: Supply Window Size: Number of days for grouping supplies into windows; it defaults to 1. If you do not enter a value, enter 0, or enter a negative value, the planning engine uses value 1.
Set the profile MSC: Minimize Workorder crossovers during reschedules to Yes to avoid pushing any supply forward to complete a work order even if there is some excess. This ensures that the supply is not pegged to a safety stock and therefore, the safety stock date will be closer to the real demand date.
For more details on the profile option, see MSC Profile Options
To set up safety stock planning and to understand the safety stock planning process, see Safety Stock.
Overview of Safety Stock Pegging
The planning engine plans to meet safety stock levels through a process of sequential phases:
Safety stock smoothing: Smooths out fluctuations in safety stock. This phase is optional. The planning engine only performs safety stock pegging if profile option MSC: Use FIFO Pegging is No.
Oracle recommends that you use priority pegging if your business uses safety stock.
Inventory netting: Creates planned orders and recommendations to meet safety stock levels
Pegging: Associates supplies and demands
Scheduling: Detailed schedules safety stock supplies
This topic explains the Pegging phase. To understand the other planning phases, see Safety Stock.
To view the results of safety stock pegging, use theSupply/Demand Window.
Safety Stock Pegging Phases
The planning engine plans to peg safety stock through a process of sequential phases:
Peg to non-transient safety stock levels.
Peg to demands
Peg to transient safety stock levels
Non-transient safety stock levels are levels that you must hold throughout the planning horizon. They are safety stock levels without ending effectivity dates.
Transient safety stock levels are levels that you must hold for only a certain time during the planning horizon. They are safety stock levels with ending effectivity dates
The safety stock level for a day can be a combination of non-transient and transient safety stock levels for that day.
The planning engine pegs non-transient and transient safety stocks differently. For:
Transient safety stock levels: It may dual-peg them to both satisfy a safety stock level and also to satisfy a future demand after the safety stock level has expired and safety stock level goes down
Non-transient safety stock levels: It only pegs them to safety stock level, never to demand
In all examples, please assume:
Profile option MSO: Demand Window Size is 1
Profile option MSO: Supply Window Size is 1
Demand dates are unconstrained demand dates. Unconstrained demand dates are demand dates calculated before scheduling. Scheduling of supplies occurs after pegging.
Safety Stock Pegging Phase 1: Peg to Non-transient Safety Stock Levels
You can choose to exclude non-transient safety stock demands from the pegging logic; set profile option MSC: Include Safety Stocks in Priority based Pegging to No. The pegging process:
First pegs all non-transient safety stock levels to non-firm planned orders
Then pegs other demands to supplies
If you set profile option MSC: Include Safety Stocks in Priority based Pegging to Yes, the pegging process does not give preferential treatment to the non-transient safety stock levels and pegs them at the same time as the demands.
Safety Stock Pegging Phase 2: Peg to Demands
The planning engine performs priority pegging logic using demands and supplies within each supply and demand window. It does not consider transient safety stocks. It does consider non-transient safety stocks if it has not pegged them in the previous optional phase.
Safety Stock Pegging Phase 3: Peg to Transient Safety Stock Levels
The planning engine performs priority pegging logic using transient safety stock levels and supplies. It pegs the supplies at quantity 0 because these supplies will eventually satisfy demands. It pegs the transient safety stock levels to the lowest priority supplies in the supply window.
This table shows pegging to a transient safety stock level. It details:
D: Demand
SSL(T): Transient safety stock level
S1: Supply 1
The transient safety stock level pegs to Supply 1 from D1 to D9 at quantity 0. The demand on D10 for quantity 10 pegs to Supply 1 on D10 at quantity 10.
| 1 | 2 | 3 | 4 | 5 | 6 | 7 | 8 | 9 | 10 | 11 | 12 | 13 | 14 | 15 | |
|---|---|---|---|---|---|---|---|---|---|---|---|---|---|---|---|
| D | - | - | - | - | - | - | - | - | - | 10 | - | - | - | - | - |
| SSL(T) | 10 | 10 | 10 | 10 | 10 | 10 | 10 | 10 | 10 | 10 | - | - | - | - | - |
| S1 | 10 | ||||||||||||||
| S1 pegs to | SSL(T) | SSL(T) | SSL(T) | SSL(T) | SSL(T) | SSL(T) | SSL(T) | SSL(T) | SSL(T) | D | - | - | - | - | - |
| S1 peg qty | 0 | 0 | 0 | 0 | 0 | 0 | 0 | 0 | 0 | 10 | - | - | - | - | - |
Other Safety Stock Pegging Principles
Other safety stock pegging principles are:
The planning engine can peg a safety stock level to more than one supply
The planning engine can split planned orders to peg to different transient safety stock levels. To enable this, set profile option MSC: Split Planned Order to perform safety stock pegging to Yes or Yes But Do Not Violate Order Modifiers.
The peg to a transient safety stock level expires either when the transient safety stock level expires or when the supply is consumed by demands.
A supply that pegs to a transient safety stock level and also to multiple demands may contribute less to its pegged safety stock level over time. As time progresses, the demands consume a part of its quantity at different times; the remaining quantity remains pegged to the transient safety stock level.
The planning engine can push out dependent demands of supplies that peg to safety stock levels: Use this method when your constraints tend to cause the scheduling phase of planning to push resource requirements out and result in unneeded safety stock at lower bill of material levels. To enable this, set a value for profile option MSO: Supply Reschedule Window Size for Safety Stock Pegging. The value is the number of reschedule that the pegging process estimates when it makes decisions against transient safety stocks.
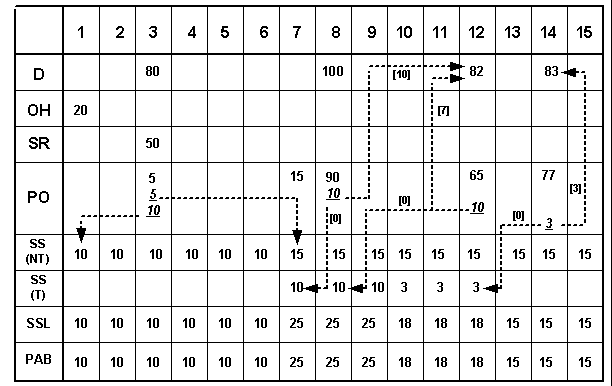
This diagram shows an inventory netting scenario with pegging indicated. It chiefly shows the pegging of safety stock levels. The planning engine does peg other demands and supplies that do not appear pegged here or do not appear completely pegged here.
It details:
D: Demands
OH: On-hand balance
SR: Scheduled receipts
PO: Planned orders
SS(NT): Non transient safety stock levels
SS(T): Transient safety stock level
SSL: Safety stock level
PAB: Projected Available Balance
In this diagram, the non-transient safety stock levels (quantity 10 beginning on day 1 and an additional quantity 5 beginning on day 7) peg to supplies due on day 3.
For transient safety stock:
The quantity 10 on day 7 pegs to the planned order quantity 10 consumed on day 8.
The quantity 10 on days 8 and 9 and the quantity 3 on days 10 and 11 peg to the planned order quantity 10 consumed on day 12
The quantity 3 on day 12 pegs to the planned order quantity 3 consumed on day 14.
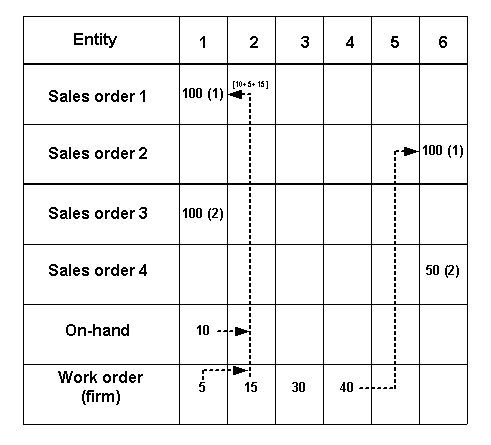
When you create a production plan during constrained master scheduling or, an unconstrained plan with pegging enabled, Oracle Advanced Supply Chain Planning allows you to see product family planned orders that are pegged to existing sources of supply including, On-hand, Work In Process jobs and firm planned orders if any. You can do this if:
The planning method for product family item and the member items are the same
You are performing constrained master scheduling in which the member items or some of their components are critical items. This ensures that both the product family and the member items reside in the same plan.
The planning engine does not generate pegging:
Across different plans
For example, if product family PF-1 is in production plan and you use that to drive manufacturing plan for member items M-A and M-B, the planning engine does not derive pegging in this scenario.
For sales orders
Note: Only demand that is pushed down from the aggregate demand statement is pegged.
Product family push down demand = Total supply (Planned orders) - Sales order demand (Rolled up sales orders at the product family level)
You can view the Pegging region of the Supply/Demand window to analyze the impact of changing a supply or demand order at any level of your bill of material.
Navigate to Plan Options > Main tab.
Select the Enable Pegging check box for an unconstrained plan.
Alternatively, you can choose to generate a constrained/optimized plan. In this case, the planning engine always generates pegging.
Using the pegging tree, you can trace demand and supply up or down from any bill of material level.
If you have any item in a supply chain bill marked for pegging, the planning engine pegs for the top level assembly.
For the planning engine to peg a component, you must mark its assembly for pegging.
Select the desired item in the Navigator.
Navigate Tools > Supply/Demand.
In the Supply/Demand window, the pegging tree appears in the bottom half of the window.
The default display for viewing pegging from demand to supply is supply order details and end item demand order information. The default display for viewing pegging from supply to demand is supply order details, immediate parent demand information, and end item demand information.
To expand the entire pegging tree, select (highlight) the top pegging node (root), right-click, and select Expand All.
You can explode each node to higher level or lower level nodes by clicking on the plus and minus signs. You can also jump to other detail windows by right-clicking the pegging node.
To see a node's properties, highlight it, right-click it, and select Properties.
The following right-click menu options are available from the pegging region:
| Right-click Menu Option | Available For Demand Line or Supply Line | Description |
|---|---|---|
| Exception Details | Both | Use to navigate to the Exception Details window. |
| Horizontal Plan | Both | Use this to navigate to the Horizontal Plan window. |
| Vertical Plan | Both | Use this to navigate to the Vertical Plan window. |
| Items | Both | Use this to navigate to the Items window. |
| Resource Requirements | Supply Line | Use this to navigate to the Resource Requirements window. |
| Expand | Both | Use this to expand all the pegging lines below the line you highlight in the pegging tree. |
| Refresh Supply/Demand | Both | Use this option to refresh the information in the Supply/Demand region. The planning engine does not change the information in the pegging region. |
| Calendar | Both | Various Calendar options (such as Organization Shipping and receiving) are available. |
| Refresh | Demand Line | The planning engine refreshes the information in the pegging region. |
Pegging information is available in the pegging region of the Supply/Demand window. You can use the icons provided in this window to perform the following:
Supply Pegging icon and Demand Pegging icon: View upstream (demand pegging) and downstream pegging (supply pegging) for a particular supply or demand record in the same window. By default, a supply line has upstream pegging while a demand line has downstream pegging. You can change the pegging direction by clicking on these icons.
Backward Navigation icon and Forward Navigation icon: Navigate forward or backward to multiple Supply/Demand windows to view pegging information for different items.
For example, while navigating a pegging tree, you may want to view the demand pegging for a different item in the pegging tree. To do this, highlight the pegging line of the item and click the Demand Pegging icon. The planning engine refreshes only the pegging region and creates the highlighted line in the pegging region as the root pegging line. You can use the Backward Navigation to return to the previous context in the pegging region. The state of the pegging region is maintained so that you return to the pegging region as you left it.
The history of your forward and backward navigation is cleared when you select a different node from the Navigator or the Query result window. In addition, the history of the navigation is cleared when you select a different supply or demand line from the supply and demand region of the Supply/Demand window.
After you select an item from a plan or from a query result window and open the Supply/Demand window, you may have subsequent different context in the Supply/Demand window as you drill through pegging and view supply/demand for a different item.
The planning engine saves a copy of the contents in the entire Supply Demand window when a different root node (different item) appears in the pegging region. However, the planning engine does not save a copy of the Supply Demand window if you change the context in the supply/demand region of the window by firming a supply, querying a subset of records, or refreshing supply/demand.
Hide Dependant Demands and Show Dependant Demands toggle icon: This is a toggle icon and can be used to switch between hide and show of dependent demand pegging lines.
Hide Operation/Resource and Show Operation/Resource toggle icon: This is a toggle icon and can be used to switch between hide and show operation and resource pegging lines. By default, the planning engine displays the operation and resource lines in the pegging tree.
You can perform the following tasks to manage VMI supplies using the Planner Workbench:
Search for VMI supplies using the VMI Flag criterion in the Find Supply/Demand window. After you specify the condition for the VMI flag, the records that meet your criteria appear in the Supply/Demand window. You can view all supplies (planned orders, requisitions, purchase orders, in transit shipments) that are managed by a VMI-enabled supplier.
Prevent the release of those planned orders that are sourced from VMI-enabled suppliers. You need not create a requisition for items managed by suppliers. To prevent the release of VMI items, clear the Release VMI Items check box in the Other tabbed pane of the Preferences window.
Create forecasts for VMI items and publish them to your suppliers.