Perform the following to set up Receivables to create balance forward bills.
The Balance Forward Billing program uses balance forward billing cycles:
To determine the billing date of a balance forward bill.
To select the transactions to include in the balance forward bill.
See: Balance Forward Billing Cycles.
Create one or more payment terms for use with balance forward billing by assigning a balance forward billing cycle to a payment term. See: Payment Terms.
Assign balance forward billing payment terms at the customer profile class, account, or site level. Receivables defaults the assigned payment term during transaction entry.
Enabling balance forward billing is a two step process:
Depending on setup, customers can generate balance forward bills consolidated at either the account or site level:
To set up a customer profile class for balance forward billing, update an existing customer profile class with balance forward billing information, or define a new customer profile class.
Note: The balance forward billing information entered at the customer profile class level is defaulted at the account and site profile levels.
To update a customer profile class with balance forward billing information
Navigate to the Customer Profile Classes window.
Query the profile class to update.
In the Balance Forward Billing region, select Enable.
Note: When you select Enable, Bill Level and Type become required and the Payment Terms list of values displays only balance forward billing payment terms. If you do not select Enable, then Bill Level and Type are not required and the Payment Terms list of values displays only non-balance forward billing payment terms.
Select the Bill Level to indicate whether customers assigned to this profile class will receive balance forward bills consolidated at either the account or site level.
Select Type: Detail, Summary, or Import.
Select the bill format type to indicate the bill format.
Detail lists the item description, quantity, and unit price for each item on each invoice.
Summary lists only the total amount of each transaction.
Attention: The Imported format supports the Imported Billing Number feature, and is available only if the bill level is set to Site. You cannot print the Imported format using the Balance Forward Billing Print program. Use custom invoices instead. See: Imported Billing Number.
Select a balance forward billing payment term from the Payment Terms list of values.
(Optional) Select Override Terms only if you want to exclude some transactions in the balance forward bill for customers using this profile class. When you select Override Terms, only non-balance forward payment terms and the balance forward billing payment term associated at the profile class, account, or site level are available for selection in the Transactions workbench. You can select an appropriate non-balance forward payment term to exclude a particular transaction.
Suggestion: Not selecting Override Terms ensures that all transactions for a particular customer account or site share the same balance forward billing payment term, due date, and aging.
You can assign this customer profile class to new customers on the Create Customer page, and to existing customers on the Account and Site profile tabs. See:
Use account and site profiles to:
Generate balance forward bills consolidated at either the account or site level. See:
Generate individual invoices for regular billing.
Disable balance forward billing. See: Disabling Balance Forward Billing.
Set up account and site profiles by selecting an appropriate customer profile class from the Account Overview page, and by updating the defaulted balance forward billing information.
The balance forward information entered at the customer profile class level is defaulted at the account profile. The same holds true for the site profile with the exception of Bill Level and Type, which are defaulted at the site profile from the account profile. Bill Level is displayed as a read-only field at the site profile level. When Bill Level is set to Site, you can update Type at the site profile. However, Type is not displayed at all at the site profile when Bill Level is set to Account.
Attention: The modifications that you make to the defaulted values of a particular account or account site profile apply only to that particular account or site profile.
To update account and site profile classes with balance forward billing information:
Navigate to the Account or Site Profile subtab on the Account Overview page.
The remaining steps are same as that for updating a customer profile class with balance forward billing information. See: Setting Up Customer Profile Classes.
To define new account and site profile classes with balance forward billing information:
Navigate to the Account or Profile subtab on the Account Overview page.
See:
Attention: You must enable balance forward billing for a customer both at the account and site profile level in order for Receivables to pick any transactions of the customer. If balance forward billing is enabled at the site profile level but not at the account profile level, the application does not recognize the site as a balance forward billing site. Although transactions for the site continue to inherit the balance forward billing payment term, Receivables never picks them up.
Account-level balance forward billing lets you send one bill for each operating unit of an account to the primary bill-to site of the account, instead of a separate bill for each site.
To generate account level bills, select Account as the Bill Level at the customer profile class and account profile level. The Bill Level at the site profile level is a read-only field, defaulted from the account profile level. The values for Type and Payment Term set at the account profile level are used for billing. Corresponding values set at the site profile level are ignored.
You need not set all sites under an account for balance forward billing. You can exclude activities for a site from an account level bill by not disabling balance forward billing at the site profile level. See: Disabling Balance Forward Billing.
You can also exclude specific transactions from an account level balance forward bill if you selected Override Terms while defining the balance forward billing payment terms. You can generate regular individual invoices for such transactions by assigning them an appropriate non-balance forward billing payment term.
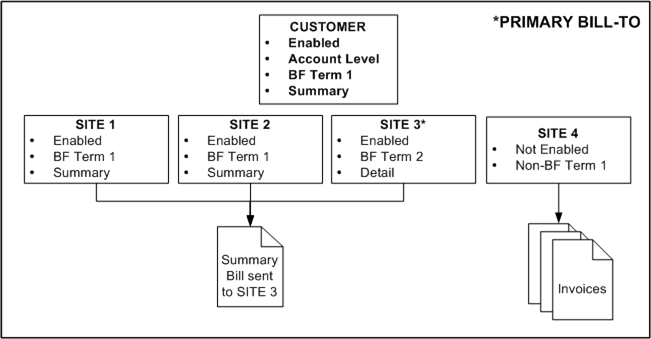
The following diagram illustrates account level balance forward billing.
Customer with Account Level Balance Forward Billing
In this example, the customer has four sites under the same operating unit. While balance forward billing is enabled at sites 1, 2, and 3, site 4 is not enabled for balance forward billing. Consequently, the account level balance forward bill consolidates transactions for only sites 1, 2, and 3 and is sent to the primary bill-to site, which is designated as Site 3. Transactions for Site 4 are not included in the account level bill.
Because balance forward billing is set at the account level, Receivables generates the account level balance forward bill using the payment term and the type (bill format) selected at the account profile level. Receivables ignores the payment terms and bill formats set at the site profile level.
Regular, individual invoices are sent to the bill-to addresses of Site 4's transactions. Additionally, if this customer's account profile has Override Terms selected, then any transactions with non-balance forward billing payment terms at Sites 1, 2, and 3 are excluded from the balance forward bill and also receive individual invoices.
Use site level balance forward billing to generate balance forward bills consolidated at site level.
To generate site level bills, select Site as the bill level at the customer profile class and account profile level. The Bill Level at the site profile level is a read-only field, defaulted from the account profile level. The values for Type and Payment Term set at each site profile level are used for billing that site. These values can be different for each site.
Under site level balance forward billing, both balance forward billing and non-balance forward billing sites can exist under the same account. Receivables generates individual invoices for the non-balance forward billing sites and a bill per site for the balance forward billing sites. You can designate each site of the account as either balance forward billing or regular billing by enabling or disabling balance forward billing at the site profile level. See: Disabling Balance Forward Billing.
You can exclude specific transactions from a site level balance forward bill if you selected Override Terms while defining the balance forward billing payment term at the account profile level. You can generate regular individual invoices for such transactions by assigning them an appropriate non-balance forward billing payment term.
The following diagram illustrates site level balance forward billing.
Customer with Site Level Balance Forward Billing
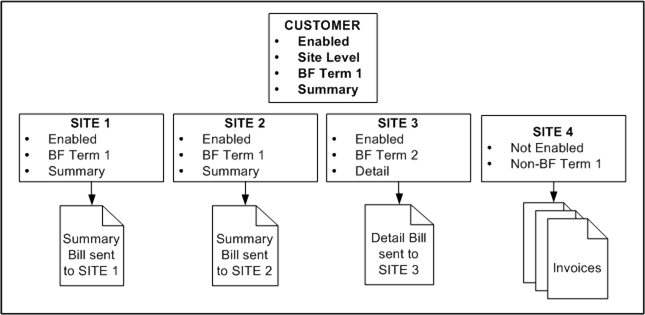
In this example, the customer has four sites under the same operating unit. While balance forward billing is enabled at sites 1, 2, and 3, Site 4 is set up for regular billing.
Consequently, a unique and distinct balance forward bill will be generated for each site 1 through 3. However, Regular, individual invoices are sent to the bill-to addresses of Site 4's transactions. Additionally, if this customer's account profile has Override Terms selected, then any transactions with non-balance forward billing payment terms at Sites 1, 2, and 3 are excluded from the respective site-level balance forward bill and also receive individual invoices.
.
You can disable balance forward billing for a customer either at the site level or at both account and site level.
To disable balance forward billing at the site level:
Navigate to the Site Profile tab of the Account Site Overview page.
Deselect Enable.
To disable balance forward billing at both account and site level:
Navigate to the Account Profile tab of the Account Overview page.
Deselect Enable.
Attention: If balance forward billing is disabled at the account profile level, then it is automatically disabled at the site profile levels.
